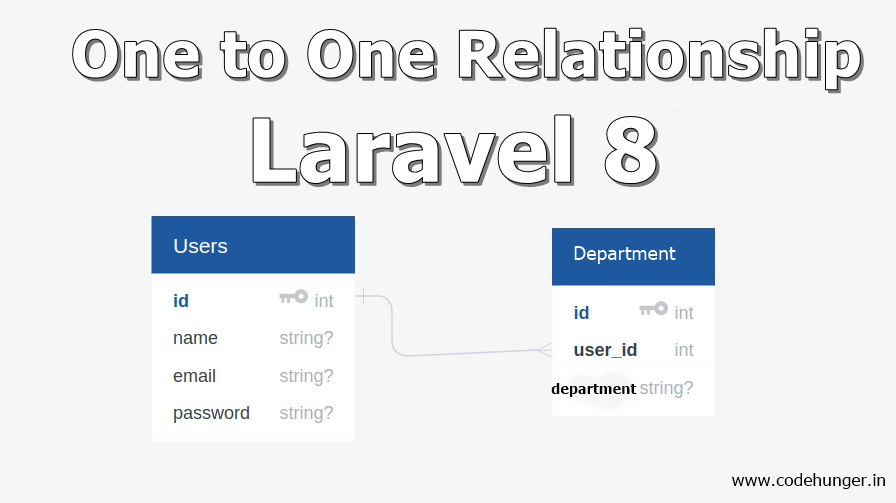
In this airticle we will learn about One to one relationship in Laravel 8. One to one relationship model is very easy and simple.In this blog we will learn many things like how we can create migration,model and create one to one relationship in laravel 8.
To create one to one relationship in Laravel 8 we are going to follow the below steps. If you want to know more about the one to one relationship in Laravel you can also visit Laravel’s official site from here.
- Install Laravel
- Create Migration and Model
- Write Migration Code
- Run the Migration
- Write Model Code
- Retrive the record
- Create the record
Step-1: Download the Laravel Application
Open your command prompt under your htdocs and run the below command
composer create-project laravel/laravel laravel-relationship
Step-2: Create Migration for one to one relationship
To create migration in order to learn one to one relationship in laravel 8 we will run the below command. first, we going to create a user model and migration. The below command will create a model and migration file for users.
Note : Leave the below command if User model is already present under your app/Http/Models
php artisan make:model User -mNow we are going to create a department model, to create a department model and migration we are going to run the below command.
php artisan make:model Department -mThe above command will create Department model under app/http/models and a migration file under databse/migrations.
Step-3: Write migration code
Now go to database/migrations/ and open users migration file, the file is much similar to that one 2014_10_12_000000_create_users_table.php open that file and write the code as given below.
<?php

use Illuminate\Database\Migrations\Migration;
use Illuminate\Database\Schema\Blueprint;
use Illuminate\Support\Facades\Schema;

class CreateUsersTable extends Migration
{
    /**
     * Run the migrations.
     *
     * @return void
     */
    public function up()
    {
        Schema::create('users', function (Blueprint $table) {
            $table->id();
            $table->string('name');
            $table->string('email')->unique();
            $table->timestamp('email_verified_at')->nullable();
            $table->string('password');
            $table->rememberToken();
            $table->timestamps();
        });
    }

    /**
     * Reverse the migrations.
     *
     * @return void
     */
    public function down()
    {
        Schema::dropIfExists('users');
    }
}
Now open the department migration file this file is also present under database/migration having a name like this 2014_10_12_000235_create_departments_table.php and add the code like below
<?php

use Illuminate\Database\Migrations\Migration;
use Illuminate\Database\Schema\Blueprint;
use Illuminate\Support\Facades\Schema;

class CreateDepartmentsTable extends Migration
{
    /**
     * Run the migrations.
     *
     * @return void
     */
    public function up()
    {
        Schema::create('departments', function (Blueprint $table) {
            $table->id();
            $table->string('department');

            $table->bigInteger('user_id')->unsigned()->index();
            $table->foreign('user_id')->references('id')->on('users')->onDelete('cascade');

            $table->timestamps();
        });
    }

    /**
     * Reverse the migrations.
     *
     * @return void
     */
    public function down()
    {
        Schema::dropIfExists('departments');
    }
}
Now run the migration command in order to create table in database to run the migration command please enter the below code
php artisan migrateStep-4: Write code in the model
Open app/Http/model/User.php and write the below code
<?php

namespace App\Models;

use Illuminate\Contracts\Auth\MustVerifyEmail;
use Illuminate\Database\Eloquent\Factories\HasFactory;
use Illuminate\Foundation\Auth\User as Authenticatable;
use Illuminate\Notifications\Notifiable;

class User extends Authenticatable
{
    use HasFactory, Notifiable;

    protected $table = 'users';

    /**
     * The attributes that are mass assignable.
     *
     * @var array
     */
    protected $fillable = [
        'name',
        'role',
        'email',
        'password',
    ];

    /**
     * The attributes that should be hidden for arrays.
     *
     * @var array
     */
    protected $hidden = [
        'password',
        'remember_token',
    ];

    /**
     * The attributes that should be cast to native types.
     *
     * @var array
     */
    protected $casts = [
        'email_verified_at' => 'datetime',
    ];

    public function department()
    {
        return $this->hasOne('App\Models\Department');
    }
}
Now open your Department.php file this file is also under app/Http/model an write the below code
<?php


namespace App\Models;


use Illuminate\Database\Eloquent\Model;


class Department extends Model
{
    /**
     * Get the user that owns the phone.
     */
    public function user()
    {
        return $this->belongsTo('App\Models\Department');
    }
}
Step-5: Retrieve the records
To retrieve the records in one to one relationship in Laravel 8 we are going to use the below code.
One to one User departpment relationship
$department= User::find(1)->department;
dd($phone);
One to one department user relationship
$user = Department::find(1)->user;
dd($user);
Step-6: Create the records
To create the records using one to one relationship in Laravel 8 run the below command.
$user = User::find(1);

$department = new Department;
$department->department = 'cse';

$user->department()->create($department);
$department = department::find(1);
$user = User::find(10);
$department->user()->associate($user)->save();I hope you like the above article, please give me 5 stars if you like the code.