
In this post we are going to see how we can implement AdMob in React Native using Firebase Console and Google AdMob. Google ads are one of the most popular ads out there, and the mobile version of Google ads is what they call AdMob.
Type of AdMob ads
Banner: A basic ad format that appears at the top & bottom of the device screen.
Interstitial: Full-page ads appear at natural breaks & transitions, such as level completion. Supports video content.
Rewarded: Full page Ads reward users for watching short videos and interacting with playable ads and surveys. Good for monetizing free-to-play users. Supports video content.
Native: Customizable ad format that matches the look & feel of your app. Ads appear inline with app content. Supports video content. For now, Native ads are only possible in Native apps, not in hybrid apps like the ones based on Ionic or React Native.
You can integrate AdMob in your app independent of Firebase. I am using Firebase connected AdMob for two reasons

- I have been using Invertase React Native Firebase plugin for quite some time. They have great documentations. Their AdMob dependency, in-turn, depends on React-Native Firebase.
- With Firebase and AdMob connected, you can view great insights about your AdMob campaign.
Steps are as follows
Step 1 — Create Firebase project
For Admob implementation, all we need from Firebase project is — GoogleService-Info.plist file (for iOS) or google-services.json file for Android
Follow these steps:
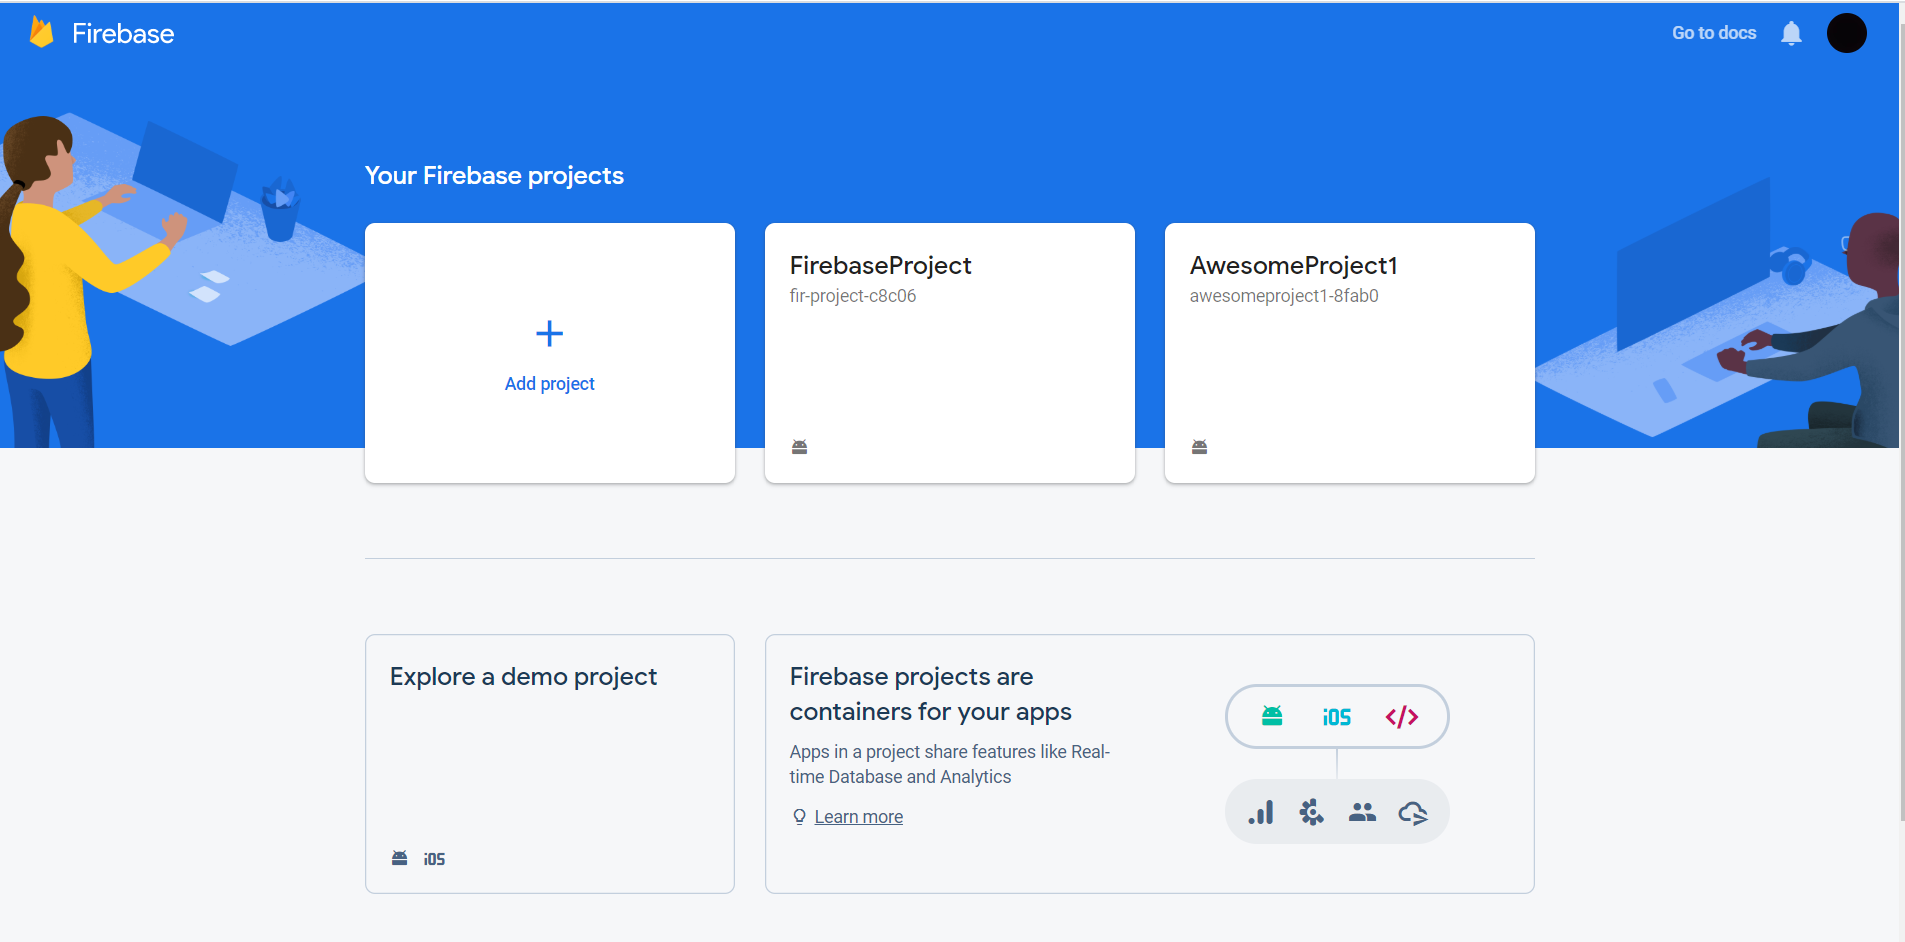
- Login into Firebase Console
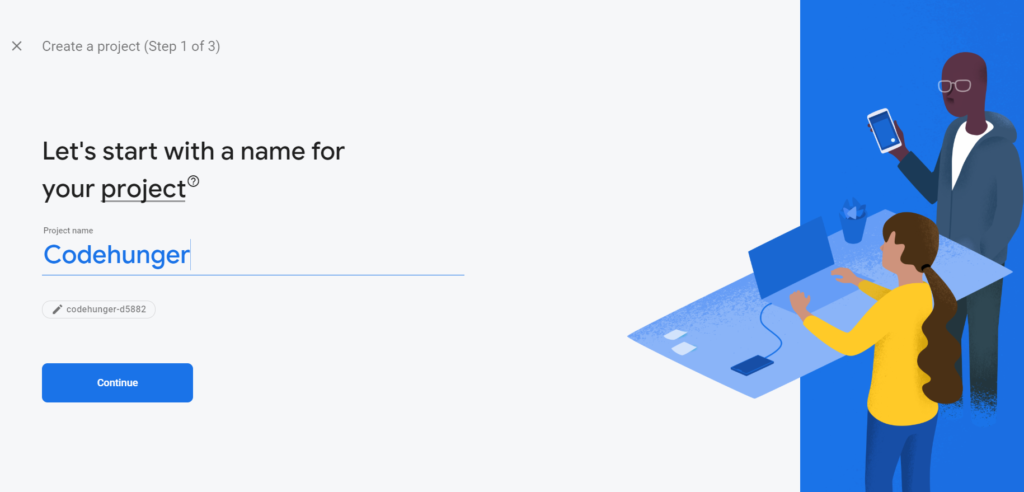
- Create Firebase Project
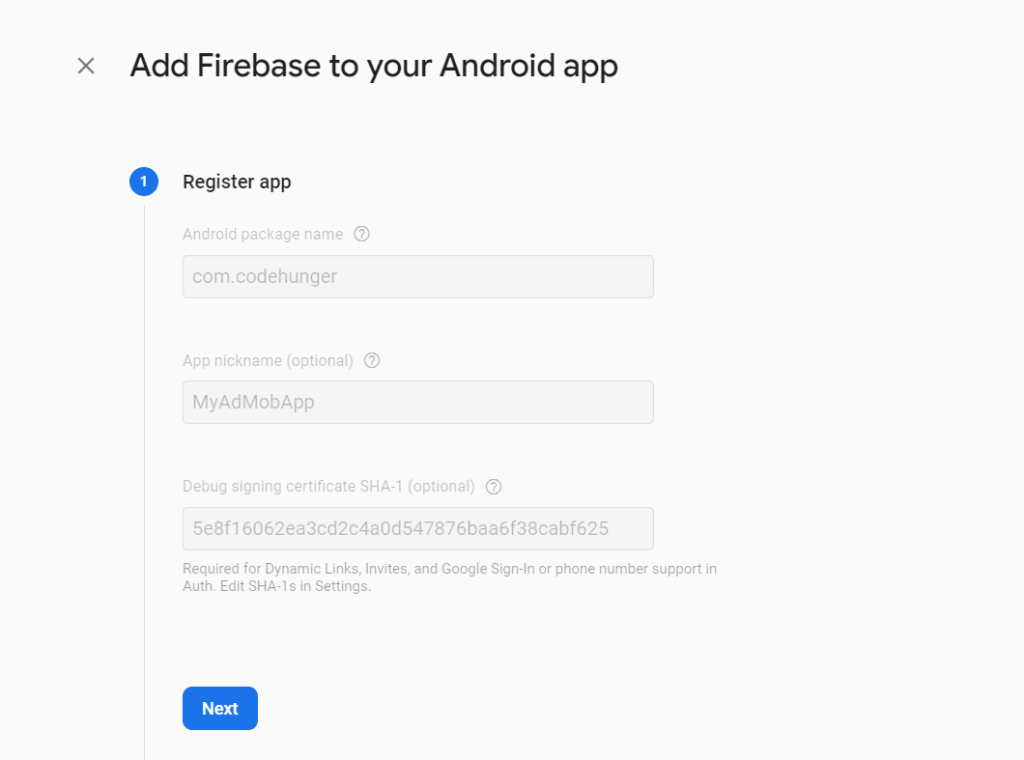
- Add an Android app (or an iOS app), register the package name, and give your app a name
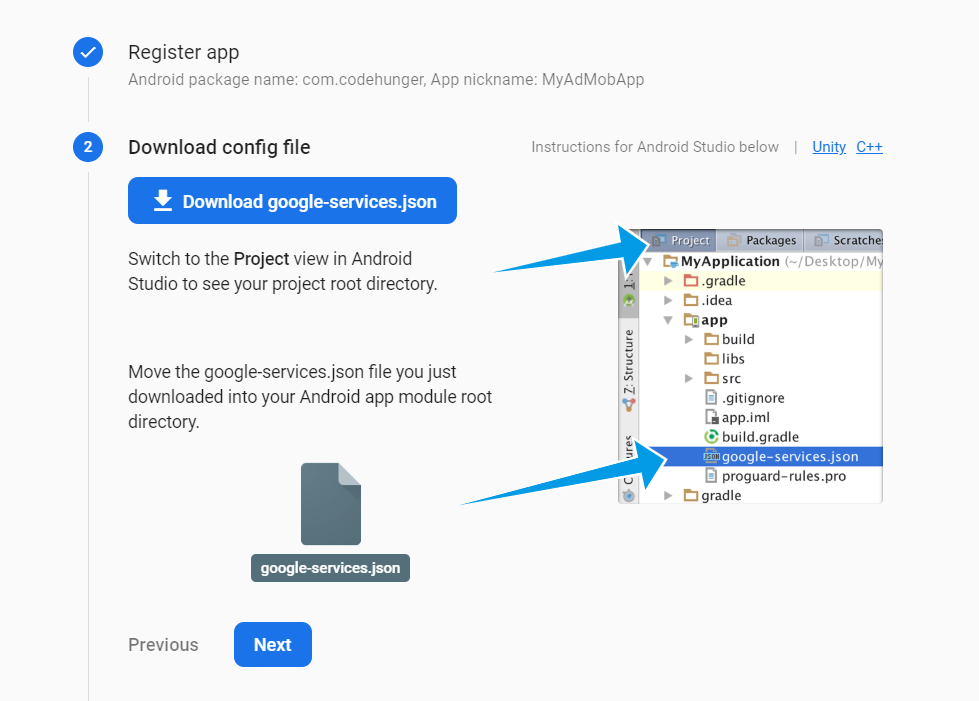
- Download Android . We’ll need this file later in the project.


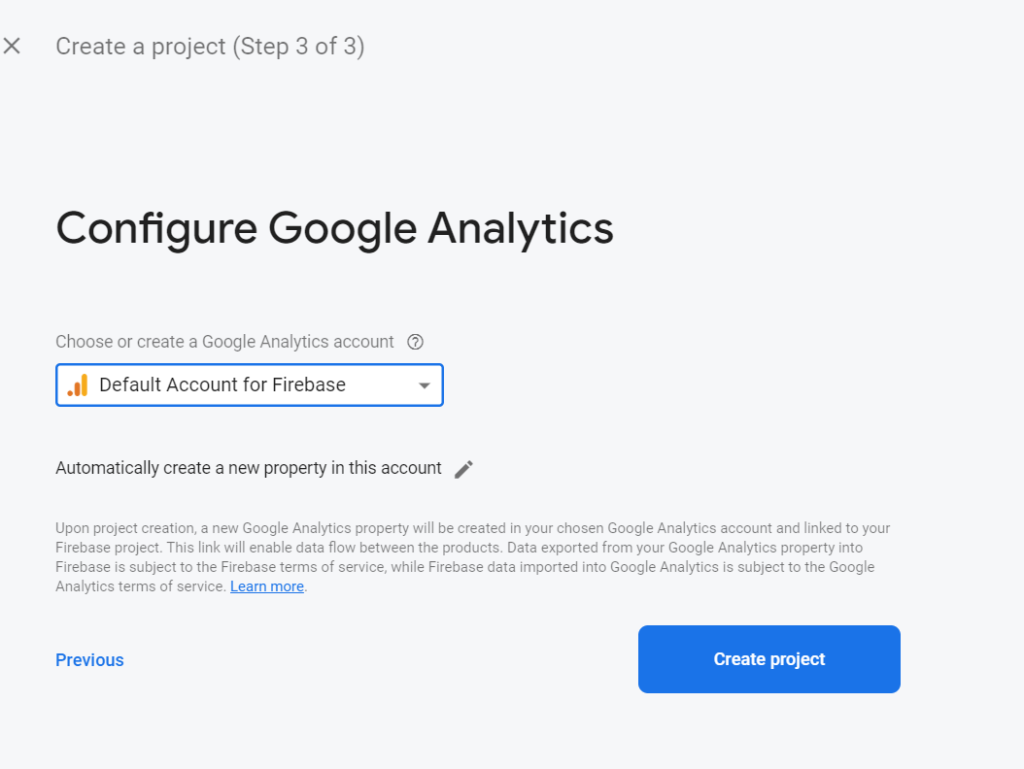
Choose a account for google analytics.
After that you got a screen like this.
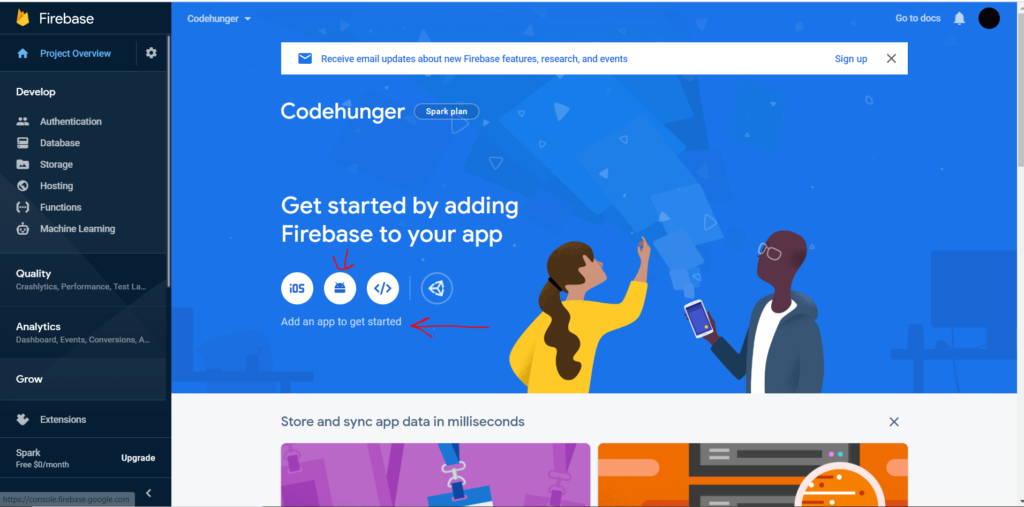
If you want to Register your app according to your platform then see the arrow marks which I have used in the above image.
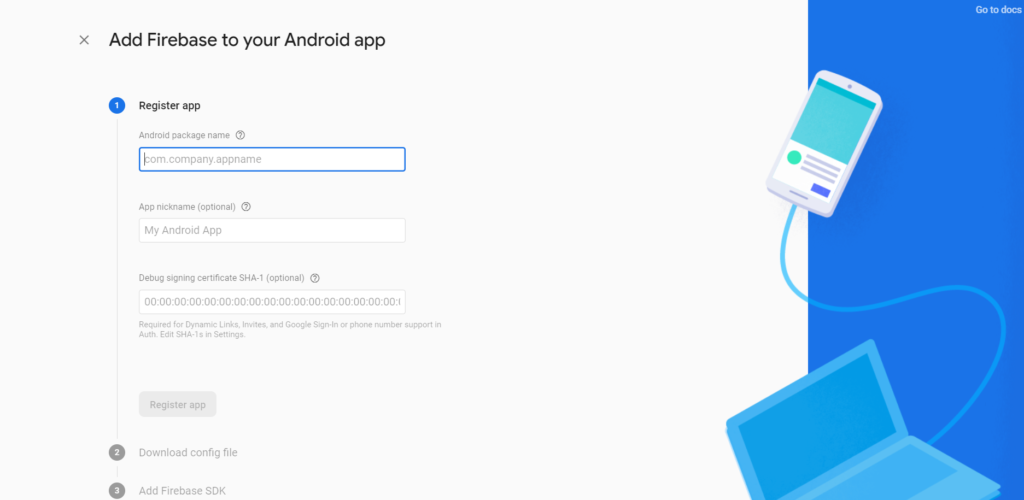
And you got a screen like this where you enter your details.
For Android Package Name just go to this location and copy the package name.
Yourproject -> android -> app -> src -> main -> AndroidManifest.xml file.
After that just provide a name of the App as per your choice. And then for getting the SHA 1 you have to follow some steps like below:
- Open the command prompt and enter this command cd C:\Program Files\Java\jdk1.8.0_251\bin and navigate to this folder.
- After that enter keytool -list -v -keystore C:/ProjectName/android/app/debug.keystore -alias androiddebugkey -storepass android -keypass android and you will get SHA1 configuration like below image.

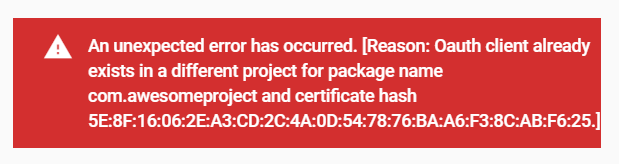
3. Copy the SHA1 and paste in the DebugSigning Certificate and when you Register your app sometimes you will get an error like below image and if you have not faced this error then stick with your default package name and skip this step.
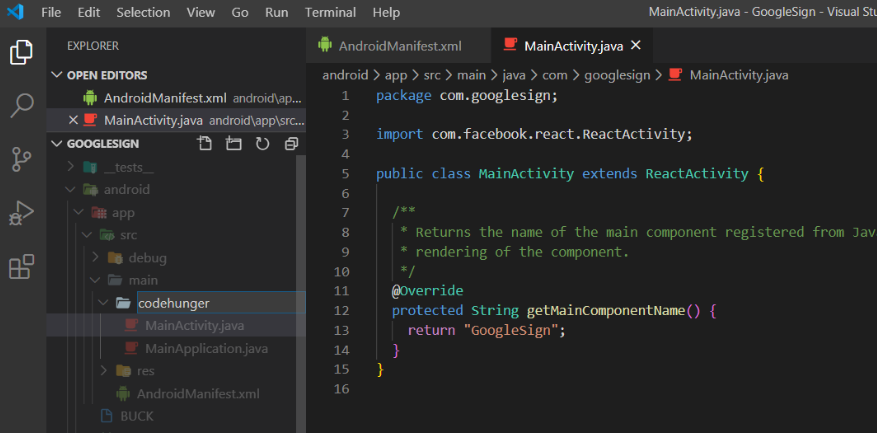
4. For this we have to change the package name of our application and below are the steps for changing the package name.
I’ve changed project’ subfolder name from: “android/app/src/main/java/MY/APP/com/” to: “android/app/src/main/java/MY/APP/AnyName/“
Then manually switched the old and new package ids:
In: android/app/src/main/java/MY/APP/NEW_ID/MainActivity.java:
package MY.APP.NEW_ID;In android/app/src/main/java/MY/APP/NEW_ID/MainApplication.java:
package MY.APP.NEW_ID;In android/app/src/main/AndroidManifest.xml:
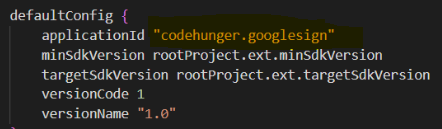
package="MY.APP.NEW_ID"And in android/app/build.gradle:
applicationId "MY.APP.NEW_ID"(Optional) In android/app/BUCK:
android_build_config(
  package="MY.APP.NEW_ID"
)
android_resource(
  package="MY.APP.NEW_ID"
)
Gradle’ cleaning in the end (in /android folder):
./gradlew cleanIf you have not faced above error for SHA1 then follow these below steps.
Just Follow the other steps and download the google-service.json and paste that file in the ProjectName\android\app.
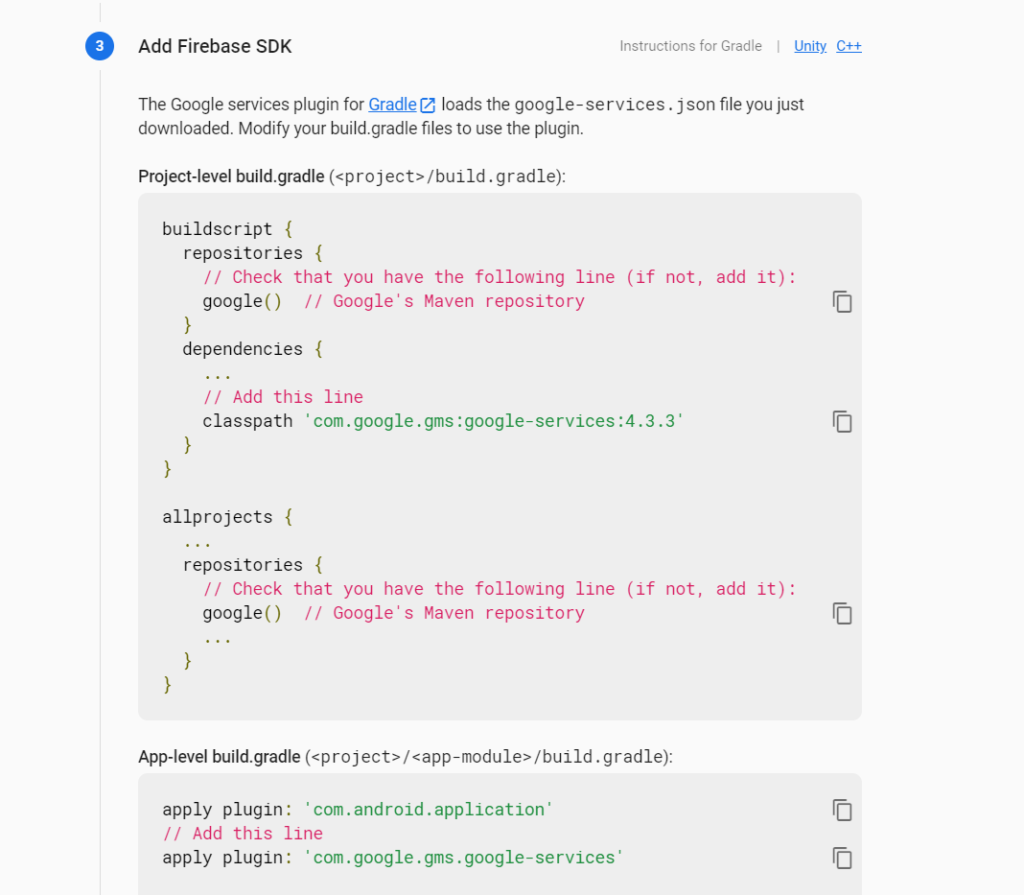
Just Update android/build.gradle with below codes where — Add this is written.
// Top-level build file where you can add configuration options common to all sub-projects/modules.

buildscript {
    ext {
        buildToolsVersion = "28.0.3"
        minSdkVersion = 16
        compileSdkVersion = 28
        targetSdkVersion = 28
    }
    repositories {
        google()  --- Add this
        jcenter()
    }
    dependencies {
        classpath("com.android.tools.build:gradle:3.5.2")
        classpath 'com.google.gms:google-services:4.1.0'  --- Add this
        // NOTE: Do not place your application dependencies here; they belong
        // in the individual module build.gradle files
    }
}

allprojects {
    repositories {
        mavenLocal()
        maven {
            // All of React Native (JS, Obj-C sources, Android binaries) is installed from npm
            url("$rootDir/../node_modules/react-native/android")
        }
        maven {
            // Android JSC is installed from npm
            url("$rootDir/../node_modules/jsc-android/dist")
        }

        google()  --- Add this
        jcenter()
        maven { url 'https://www.jitpack.io' }
    }
}
Update android/app/build.gradle with below codes where — Add this is written.
apply plugin: "com.android.application"

import com.android.build.OutputFile


project.ext.react = [
    enableHermes: false,  // clean and rebuild if changing
]

apply from: "../../node_modules/react-native/react.gradle"


def enableSeparateBuildPerCPUArchitecture = false


def enableProguardInReleaseBuilds = false


def jscFlavor = 'org.webkit:android-jsc:+'


def enableHermes = project.ext.react.get("enableHermes", false);

android {
    compileSdkVersion rootProject.ext.compileSdkVersion

    compileOptions {
        sourceCompatibility JavaVersion.VERSION_1_8
        targetCompatibility JavaVersion.VERSION_1_8
    }

    defaultConfig {
        applicationId "com.codehunger"
        minSdkVersion rootProject.ext.minSdkVersion
        targetSdkVersion rootProject.ext.targetSdkVersion
        versionCode 1
        versionName "1.0"
    }
    splits {
        abi {
            reset()
            enable enableSeparateBuildPerCPUArchitecture
            universalApk false  // If true, also generate a universal APK
            include "armeabi-v7a", "x86", "arm64-v8a", "x86_64"
        }
    }
    signingConfigs {
        debug {
            storeFile file('debug.keystore')
            storePassword 'android'
            keyAlias 'androiddebugkey'
            keyPassword 'android'
        }
    }
    buildTypes {
        debug {
            signingConfig signingConfigs.debug
        }
        release {
            signingConfig signingConfigs.debug
            minifyEnabled enableProguardInReleaseBuilds
            proguardFiles getDefaultProguardFile("proguard-android.txt"), "proguard-rules.pro"
        }
    }

    packagingOptions {
        pickFirst "lib/armeabi-v7a/libc++_shared.so"
        pickFirst "lib/arm64-v8a/libc++_shared.so"
        pickFirst "lib/x86/libc++_shared.so"
        pickFirst "lib/x86_64/libc++_shared.so"
    }

    // applicationVariants are e.g. debug, release
    applicationVariants.all { variant ->
        variant.outputs.each { output ->

            def versionCodes = ["armeabi-v7a": 1, "x86": 2, "arm64-v8a": 3, "x86_64": 4]
            def abi = output.getFilter(OutputFile.ABI)
            if (abi != null) {  // null for the universal-debug, universal-release variants
                output.versionCodeOverride =
                        versionCodes.get(abi) * 1048576 + defaultConfig.versionCode
            }

        }
    }
}

dependencies {
    implementation fileTree(dir: "libs", include: ["*.jar"])
    //noinspection GradleDynamicVersion
    implementation "com.facebook.react:react-native:+"  // From node_modules
    implementation 'com.google.firebase:firebase-analytics:17.2.2'  --- Add this
    implementation "androidx.swiperefreshlayout:swiperefreshlayout:1.0.0"

    debugImplementation("com.facebook.flipper:flipper:${FLIPPER_VERSION}") {
      exclude group:'com.facebook.fbjni'
    }

    debugImplementation("com.facebook.flipper:flipper-network-plugin:${FLIPPER_VERSION}") {
        exclude group:'com.facebook.flipper'
    }

    debugImplementation("com.facebook.flipper:flipper-fresco-plugin:${FLIPPER_VERSION}") {
        exclude group:'com.facebook.flipper'
    }

    if (enableHermes) {
        def hermesPath = "../../node_modules/hermes-engine/android/";
        debugImplementation files(hermesPath + "hermes-debug.aar")
        releaseImplementation files(hermesPath + "hermes-release.aar")
    } else {
        implementation jscFlavor
    }
}

task copyDownloadableDepsToLibs(type: Copy) {
    from configurations.compile
    into 'libs'
}

apply from: file("../../node_modules/@react-native-community/cli-platform-android/native_modules.gradle"); applyNativeModulesAppBuildGradle(project)
apply plugin: 'com.google.gms.google-services'  --- Add this
Step 2 — Create basic React Native app
Create a blank react-native app
$ react-native init AdMob
This will create a basic React-native app which you can run in a device or simulator. (either Android or iOS)
Step 3 — Setup your Admob account
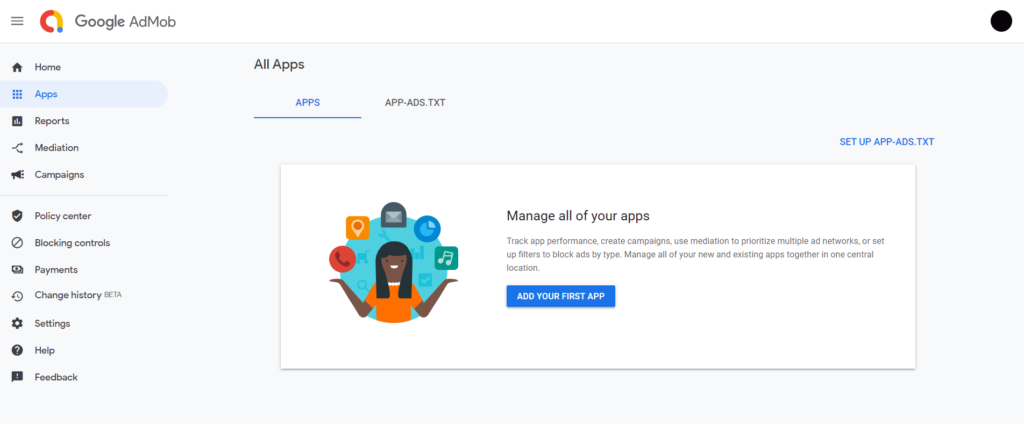
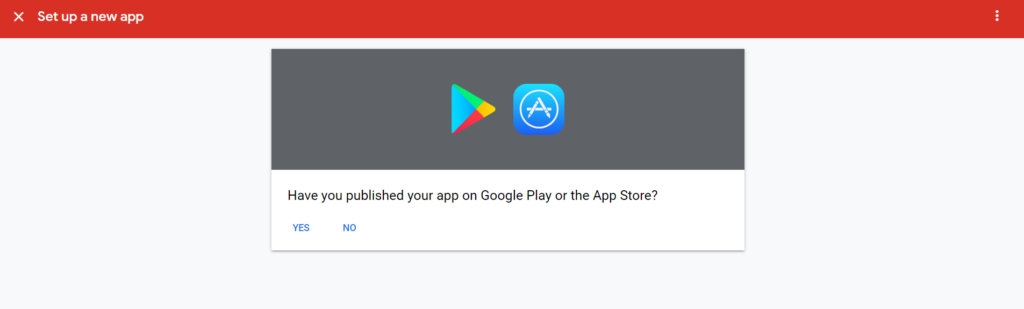
- Signup then Sign in to your AdMob account at https://apps.admob.com.
- Click Apps in the sidebar.
- Click Add app to add a new app or click View all apps to search a list of all of the apps you’ve added to AdMob.
- In the App Settings options, you can see your App ID. This is the ID you will need to connect your app to Google AdMob in your React Native app.
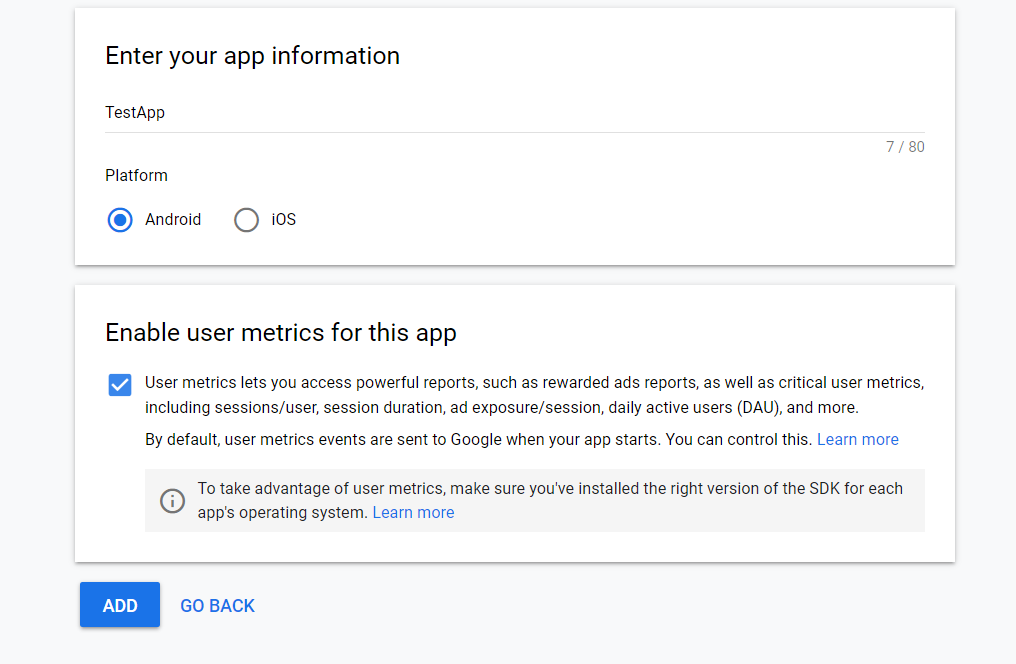
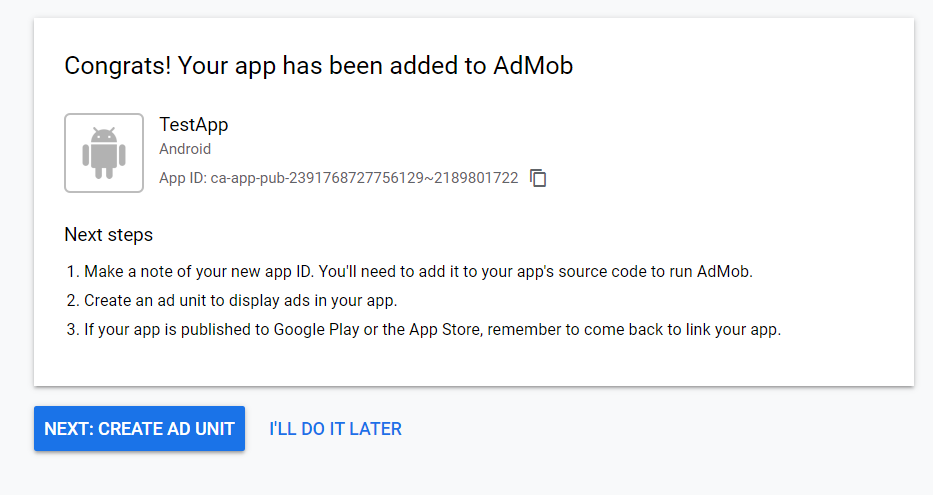
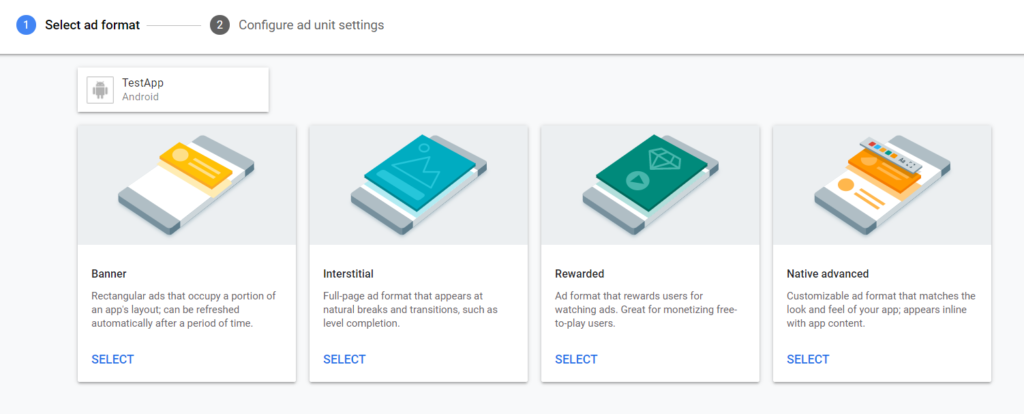
You got your App ID and then create the Ad unit according to your choice.
- In the Ad Units section, you can add multiple types of Ad units. For more details on adding Ad Units, check out the following detailed step-by-step instructions for
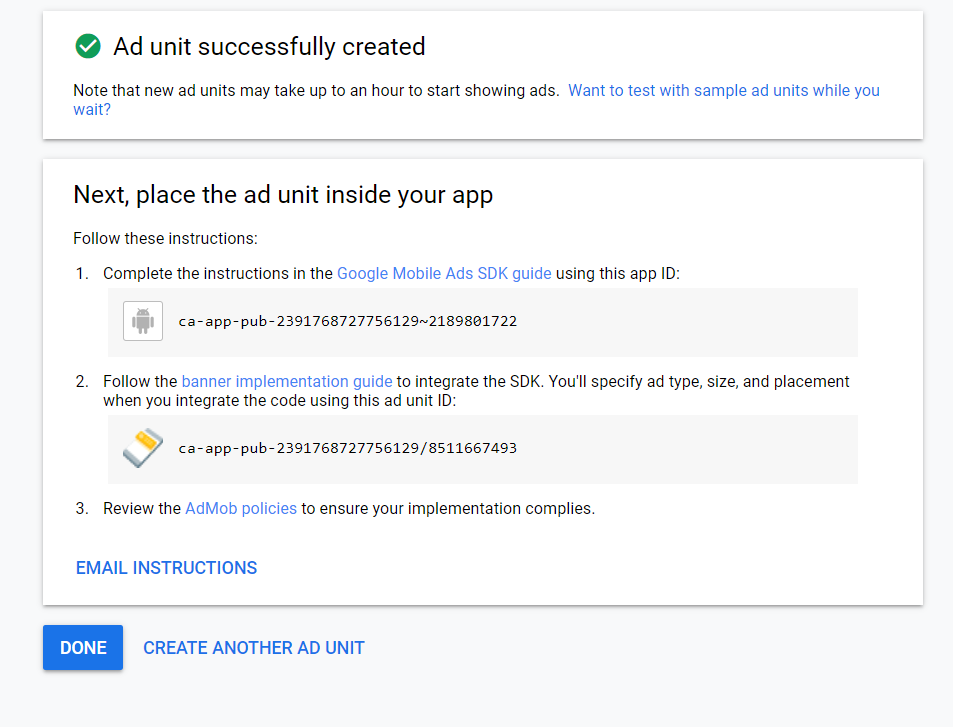
After that use these details in your App just like below.
Step 4 — Install AdMob dependency and implement
For this post, as I explained earlier, we are using AdMob with Firebase. The dependency we are using for this is React-Native Firebase. This main dependency contains several service modules, AdMob is one of them.
Install React-Native Firebase for Android
npm install –save @react-native-firebase/app
npm install –save @react-native-firebase/admob
Within the root of your React Native project, create a firebase.json file (if it doesn’t already exist) and add the admob_android_app_id & admob_ios_app_id keys with the IDs from the Google AdMob console:
// <project-root>/firebase.json
{
"react-native": {
"admob_android_app_id": "ca-app-pub-xxxxxxxx~xxxxxxxx",
"admob_ios_app_id": "ca-app-pub-xxxxxxxx~xxxxxxxx"
}
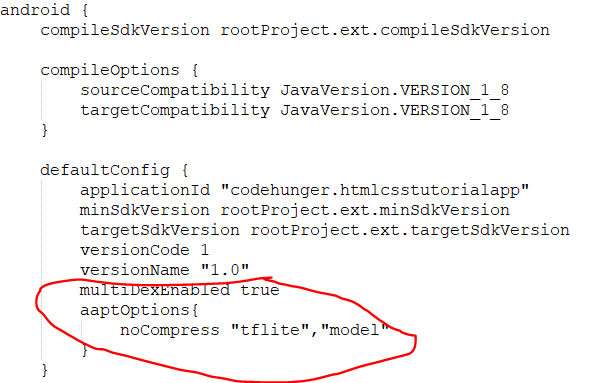
}After that if you got the error for Multidex exceeding 64k sizes then enable the multidex like below image. Add these two lines in app/build.gradle and add more line like the second image.

After installing all these things just run the app and check if there any error.
If everything is working fine then you have to add some code in your App.js file for configuring the outbound request to the ad server.
Before requesting ads, you must tell the AdMob network what type of content you’d wish to receive based on your target audience.
For example, if the application targets children then you must configure the outbound requests to only receive content suitable for children before loading any adverts.
To set the request configuration, call the setRequestConfiguration method:
import admob, { MaxAdContentRating } from '@react-native-firebase/admob';

admob()
  .setRequestConfiguration({
    // Update all future requests suitable for parental guidance
    maxAdContentRating: MaxAdContentRating.PG,

    // Indicates that you want your content treated as child-directed for purposes of COPPA.
    tagForChildDirectedTreatment: true,

    // Indicates that you want the ad request to be handled in a
    // manner suitable for users under the age of consent.
    tagForUnderAgeOfConsent: true,
  })
  .then(() => {
    // Request config successfully set!
  });
I am going to add the upper code in my App.js file and see If my app is running with ads in them.
import React, { Component } from 'react';
import {
  StyleSheet,
  View,
} from 'react-native';
import admob, { MaxAdContentRating, BannerAd, TestIds, BannerAdSize } from '@react-native-firebase/admob';
export default class Myapp extends Component {

  componentDidMount() {
    admob()
      .setRequestConfiguration({
        // Update all future requests suitable for parental guidance
        maxAdContentRating: MaxAdContentRating.PG,

        // Indicates that you want your content treated as child-directed for purposes of COPPA.
        tagForChildDirectedTreatment: true,

        // Indicates that you want the ad request to be handled in a
        // manner suitable for users under the age of consent.
        tagForUnderAgeOfConsent: true,
      })
      .then(() => {
        // Request config successfully set!
      });
  }

  render() {
    return (
      <View style={styles.body}>
        <BannerAd
          size={BannerAdSize.SMART_BANNER}
          unitId={TestIds.BANNER}
        />
      </View>
    );
  }
};

const styles = StyleSheet.create({
  body: {
    backgroundColor: '#fff',
  }
});

So in this way you can integrate Ad in your React Native Application. In the place of test adunit we can add our own adunit and also use different ad types according to your choice.


hello sir,
test id work but my App id not work and no show banner