

Hello, reader today we will get to know how to integrate Laravel stripe subscription using cashier.Now a days everyone is subscription on their website.Laravel Stripe payment gateway has built a reputation of being easy-to-use for both developers and store owners. Because of great compatibility with Laravel, Stripe has become the go-to payment gateway for Laravel eCommerce stores.
What is payment gateway ?
A payment gateway is a merchant service provided by an e-commerce application service provider that authorizes credit card or direct payments processing for e-businesses, online retailers, bricks and clicks, or traditional brick and mortar.
Laravel Stripe Payment using Cashier
Laravel Cashier makes it very simple to integrate Payment Gateway like Stripe. So let us see how we can integrate stripe in Laravel on Subscription based system.We will use the Cashier package to integrate Stripe Payment Gateway in Laravel.Another important reason for the popularity of Stripe is that it accepts all globally accepted credit and debit cards, thus facilitating payment collections from all over the world.
Install of Laravel and Creating Auth
You can install laravel by using the below command.
composer create-project --prefer-dist laravel/laravel blogNow you have to create authentication in Laravel, below code will help you install node modules with your project.
npm iBelow code will help you to create authentication in Laravel

composer require laravel/uiphp artisan ui vue --authInstall cashier by using below command
composer require laravel/cashierCreate Migration File
Now we will create migration file for plan table, below code will create migration and model together.
php artisan make:migration plan -mNow go to your migration file add replace your code with below code
<?php

use Illuminate\Database\Migrations\Migration;
use Illuminate\Database\Schema\Blueprint;
use Illuminate\Support\Facades\Schema;

class CreatePlansTable extends Migration
{
    /**
     * Run the migrations.
     *
     * @return void
     */
    public function up()
    {
        Schema::create('plans', function (Blueprint $table) {
            $table->increments('id');
            $table->string('name');
            $table->string('slug')->unique();
            $table->string('stripe_plan');
            $table->float('cost');
            $table->text('description')->nullable();
            $table->timestamps();
        });
    }

    /**
     * Reverse the migrations.
     *
     * @return void
     */
    public function down()
    {
        Schema::dropIfExists('plans');
    }
}
now go to plan modal and add the below code
<?php

namespace App;

use Illuminate\Database\Eloquent\Model;

class Plan extends Model
{
    protected $fillable = [
        'name',
        'slug',
        'stripe_plan',
        'cost',
        'description'
    ];

    public function getRouteKeyName()
    {
        return 'slug';
    }
}
Now we are ready to run the migration command, you can run a migration, using the below command. It will help you to create tables in your database
php artisan migrate
Get stripe secret and publishable key
To get those thing you need to create stripe account, you can do that thing from here, after the login you can see secret and publishable key on your dashboard.
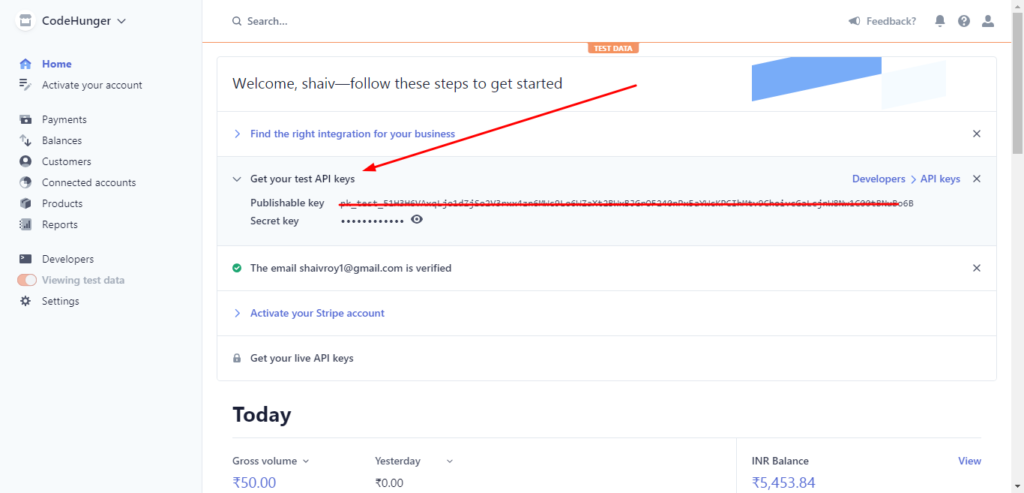
You need to add these keys inside the .env file in our project.
// .env

STRIPE_KEY=your key here
STRIPE_SECRET=your secret here
Finally, you should configure your Stripe key in your services.php configuration file. You can retrieve your Stripe API keys from the Stripe control panel.
// services.php

'stripe' => [
    'model'  => App\User::class,
    'key' => env('STRIPE_KEY'),
    'secret' => env('STRIPE_SECRET'),
],
Now you have add billable trait to your user model, just update your user model with the below code.
<?php

namespace App;

use Illuminate\Contracts\Auth\MustVerifyEmail;
use Illuminate\Foundation\Auth\User as Authenticatable;
use Illuminate\Notifications\Notifiable;
use Laravel\Cashier\Billable;

class User extends Authenticatable
{
    use Notifiable,Billable;

    /**
     * The attributes that are mass assignable.
     *
     * @var array
     */
    protected $fillable = [
        'name', 'email', 'password',
    ];

    /**
     * The attributes that should be hidden for arrays.
     *
     * @var array
     */
    protected $hidden = [
        'password', 'remember_token',
    ];

    /**
     * The attributes that should be cast to native types.
     *
     * @var array
     */
    protected $casts = [
        'email_verified_at' => 'datetime',
    ];
}
Now go to routes->web.php and add the below routes in your file
Route::group(['middleware' => 'auth'], function() {
    Route::get('/home', 'HomeController@index')->name('home');
    Route::get('/plans', 'PlanController@index')->name('plans.index');
    Route::get('/plan/{plan}', 'PlanController@show')->name('plans.show');
    Route::post('/subscription', 'SubscriptionController@create')->name('subscription.create');

    //Routes for create Plan
    Route::get('create/plan', 'SubscriptionController@createPlan')->name('create.plan');
    Route::post('store/plan', 'SubscriptionController@storePlan')->name('store.plan');
});
Now we will create two controller file to achieve our goal , run the below code to create controller file. We will user plan controller to show the plan and subscription controller will be use for creating subscription.
php artisan make:controller PlanControllerphp artisan make:controller subscriptionControllergo to your subscription controller and add the below code
<?php

namespace App\Http\Controllers;

use Illuminate\Http\Request;
use App\Plan;
use App\User;

class SubscriptionController extends Controller
{
    protected $stripe;

    public function __construct()
    {
        $this->stripe = new \Stripe\StripeClient(env('STRIPE_SECRET'));
    }

    public function create(Request $request, Plan $plan)
    {
        $plan = Plan::findOrFail($request->get('plan'));

        $user = $request->user();
        $paymentMethod = $request->paymentMethod;

        $user->createOrGetStripeCustomer();
        $user->updateDefaultPaymentMethod($paymentMethod);
        $user->newSubscription('default', $plan->stripe_plan)
            ->create($paymentMethod, [
                'email' => $user->email,
            ]);

        return redirect()->route('home')->with('success', 'Your plan subscribed successfully');
    }


    public function createPlan()
    {
        return view('plans.create');
    }

    public function storePlan(Request $request)
    {
        $data = $request->except('_token');

        $data['slug'] = strtolower($data['name']);
        $price = $data['cost'] *100;

        //create stripe product
        $stripeProduct = $this->stripe->products->create([
            'name' => $data['name'],
        ]);

        //Stripe Plan Creation
        $stripePlanCreation = $this->stripe->plans->create([
            'amount' => $price,
            'currency' => 'inr',
            'interval' => 'month', //  it can be day,week,month or year
            'product' => $stripeProduct->id,
        ]);

        $data['stripe_plan'] = $stripePlanCreation->id;

        Plan::create($data);

        echo 'plan has been created';
    }
}
Now go to your plan controller and add the below code
<?php

namespace App\Http\Controllers;

use Illuminate\Http\Request;
use App\plan;

class PlanController extends Controller
{
    /**
     * Create a new controller instance.
     *
     * @return void
    */
    public function index()
    {
        $plans = Plan::all();
        return view('plans.index', compact('plans'));
    }

    /**
     * Show the Plan.
     *
     * @return mixed
     */
    public function show(Plan $plan, Request $request)
    {
        $paymentMethods = $request->user()->paymentMethods();

        $intent = $request->user()->createSetupIntent();

        return view('plans.show', compact('plan', 'intent'));
    }
}
Update plan modal code
Now, by default, RouteModelBinding works with the ID of the model. But we will not pass the ID to show the particular plan instead we will pass the slug. So we need to define it inside the Plan.php model.Add the below code
<?php

// Plan.php

namespace App;

use Illuminate\Database\Eloquent\Model;

class Plan extends Model
{
    protected $fillable = [
        'name',
        'slug',
        'stripe_plan',
        'cost',
        'description'
    ];

    public function getRouteKeyName()
    {
        return 'slug';
    }
}
Here, we have defined the function called getRouteKeyName.
So based on this function, now we can fetch the record based on the slug and not based on the ID. That is why we have taken the slug field as a unique field in the database.
Creating and updating view Files
Now go to your home.blade.php and update your code with below
@extends('layouts.app')

@section('content')
<div class="container">
    <div class="row justify-content-center">
        <div class="col-md-8">
            @if(session()->get('success'))
                <div class="alert alert-success">
                    {{ session()->get('success') }}
                </div>
            @endif
            <div class="card">
                <div class="card-header">Dashboard</div>

                <div class="card-body">
                    @if (session('status'))
                        <div class="alert alert-success" role="alert">
                            {{ session('status') }}
                        </div>
                    @endif

                    Welcome to the Dashboard
                </div>
            </div>
        </div>
    </div>
</div>
@endsection
Now create a folder plans under resources->views and plan create three blade file create.blade.php,index.blade.php and show.blade.php
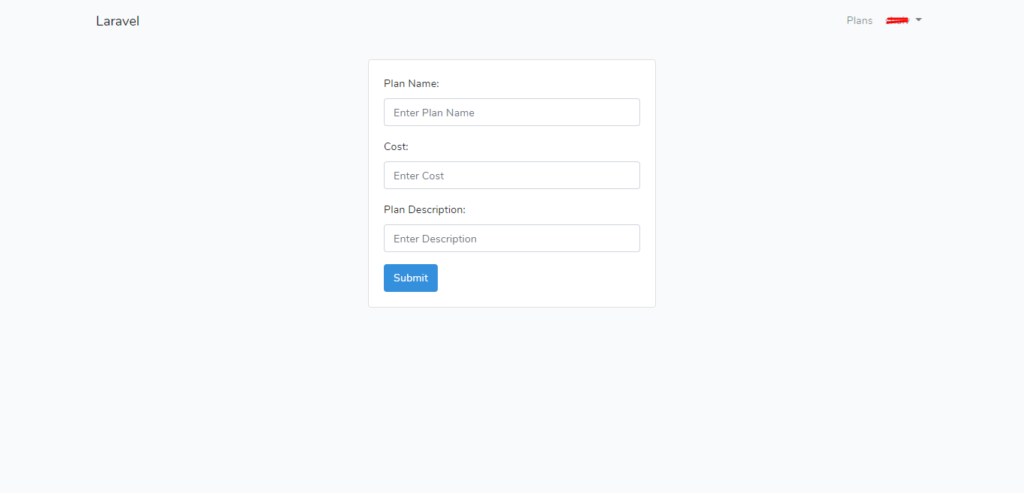
Go to your create file and the below code
@extends('layouts.app')
@section('content')
<div class="container">
<div class="card" style="width:24rem;margin:auto;">
<div class="card-body">
<form action="{{route('store.plan')}}" method="post">
@csrf
<div class="form-group">
<label for="plan name">Plan Name:</label>
<input type="text" class="form-control" name="name" placeholder="Enter Plan Name">
</div>
<div class="form-group">
<label for="cost">Cost:</label>
<input type="text" class="form-control" name="cost" placeholder="Enter Cost">
</div>
<div class="form-group">
<label for="cost">Plan Description:</label>
<input type="text" class="form-control" name="description" placeholder="Enter Description">
</div>
<button type="submit" class="btn btn-primary">Submit</button>
</form>
</div>
</div>
</div>
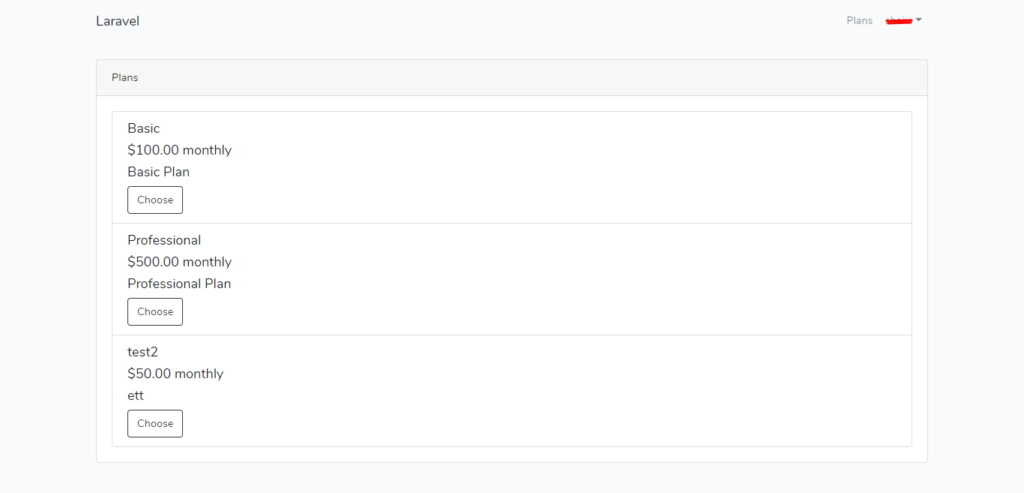
@endsectionnow go to your index file and add the below code
@extends('layouts.app')
@section('content')
<div class="container">
    <div class="row justify-content-center">
        <div class="col-md-12">
            <div class="card">
                <div class="card-header">Plans</div>
                <div class="card-body">
                    <ul class="list-group">
                        @foreach($plans as $plan)
                        <li class="list-group-item clearfix">
                            <div class="pull-left">
                                <h5>{{ $plan->name }}</h5>
                                <h5>${{ number_format($plan->cost, 2) }} monthly</h5>
                                <h5>{{ $plan->description }}</h5>
                                <a href="{{ route('plans.show', $plan->slug) }}" class="btn btn-outline-dark pull-right">Choose</a>
                            </div>
                        </li>
                        @endforeach
                    </ul>
                </div>
            </div>
        </div>
    </div>
</div>
@endsection
Now go to your show.blade.php and add the below code
@extends('layouts.app')
@section('content')
<div class="container">
    <div class="row justify-content-center">
        <div class="col-md-12">
            <div class="">
                <p>You will be charged ${{ number_format($plan->cost, 2) }} for {{ $plan->name }} Plan</p>
            </div>
            <div class="card">
                <form action="{{ route('subscription.create') }}" method="post" id="payment-form">
                    @csrf
                    <div class="form-group">
                        <div class="card-header">
                            <label for="card-element">
                                Enter your credit card information
                            </label>
                        </div>
                        <div class="card-body">
                            <div id="card-element">
                            <!-- A Stripe Element will be inserted here. -->
                            </div>
                            <!-- Used to display form errors. -->
                            <div id="card-errors" role="alert"></div>
                            <input type="hidden" name="plan" value="{{ $plan->id }}" />
                        </div>
                    </div>
                    <div class="card-footer">
                      <button
                      id="card-button"
                      class="btn btn-dark"
                      type="submit"
                      data-secret="{{ $intent->client_secret }}"
                    > Pay </button>
                    </div>
                </form>
            </div>
        </div>
    </div>
</div>
@endsection
@section('scripts')
<script src="https://js.stripe.com/v3/"></script>
<script>
    // Custom styling can be passed to options when creating an Element.
    // (Note that this demo uses a wider set of styles than the guide below.)
    var style = {
        base: {
            color: '#32325d',
            lineHeight: '18px',
            fontFamily: '"Helvetica Neue", Helvetica, sans-serif',
            fontSmoothing: 'antialiased',
            fontSize: '16px',
            '::placeholder': {
                color: '#aab7c4'
            }
        },
        invalid: {
            color: '#fa755a',
            iconColor: '#fa755a'
        }
    };

    const stripe = Stripe('{{ env("STRIPE_KEY") }}', { locale: 'en' }); // Create a Stripe client.
    const elements = stripe.elements(); // Create an instance of Elements.
    const cardElement = elements.create('card', { style: style }); // Create an instance of the card Element.
    const cardButton = document.getElementById('card-button');
    const clientSecret = cardButton.dataset.secret;

    cardElement.mount('#card-element'); // Add an instance of the card Element into the `card-element` <div>.

    // Handle real-time validation errors from the card Element.
    cardElement.addEventListener('change', function(event) {
        var displayError = document.getElementById('card-errors');
        if (event.error) {
            displayError.textContent = event.error.message;
        } else {
            displayError.textContent = '';
        }
    });

    // Handle form submission.
    var form = document.getElementById('payment-form');

    form.addEventListener('submit', function(event) {
        event.preventDefault();

        stripe
            .handleCardSetup(clientSecret, cardElement, {
                payment_method_data: {
                    //billing_details: { name: cardHolderName.value }
                }
            })
            .then(function(result) {
                console.log(result);
                if (result.error) {
                    // Inform the user if there was an error.
                    var errorElement = document.getElementById('card-errors');
                    errorElement.textContent = result.error.message;
                } else {
                    console.log(result);
                    // Send the token to your server.
                    stripeTokenHandler(result.setupIntent.payment_method);
                }
            });
    });

    // Submit the form with the token ID.
    function stripeTokenHandler(paymentMethod) {
        // Insert the token ID into the form so it gets submitted to the server
        var form = document.getElementById('payment-form');
        var hiddenInput = document.createElement('input');
        hiddenInput.setAttribute('type', 'hidden');
        hiddenInput.setAttribute('name', 'paymentMethod');
        hiddenInput.setAttribute('value', paymentMethod);
        form.appendChild(hiddenInput);

        // Submit the form
        form.submit();
    }
</script>
@endsection
Now before going to make any payment we have to create plan to create plan follow the url in your browser http://localhost/cashier/public/create/plan
After creating the plan visit the plan url http://localhost/cashier/public/plans
Choose the plan and then enter follow test card details to make payment
card number - 4242 4242 4242 4242
cvv - 123
expiry - 12/24
zip code - 12345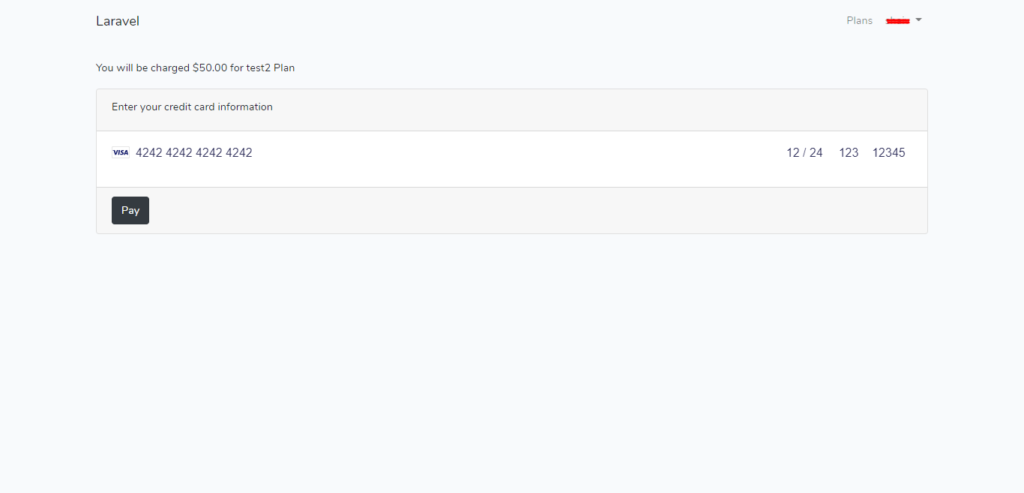
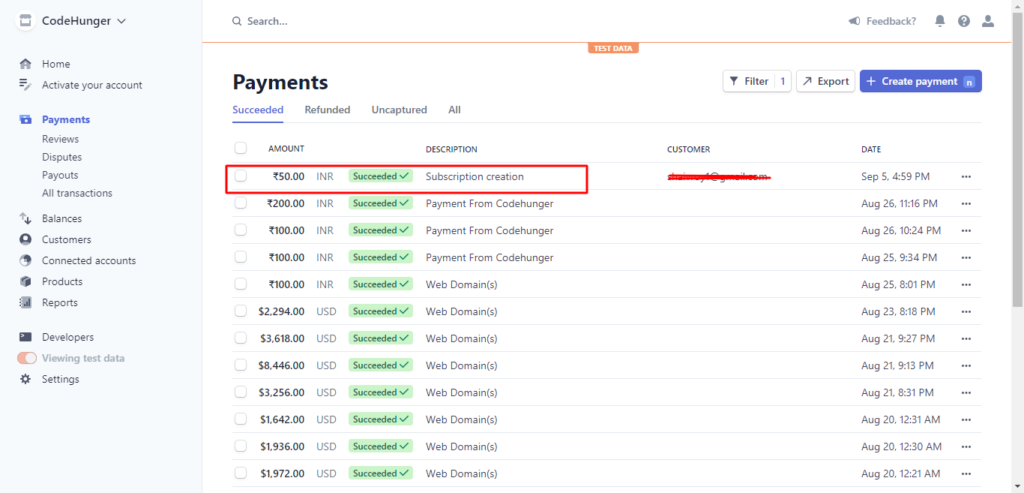
After adding those details make a payment and then check your dashboard
I hope you understand the basic concept of creating subscription using Laravel cashier


Sir card information not show me only blank filed show not written any thing
This command
php artisan make:migration plan -m
should rather be
php artisan make:model plan -m
card information not showing. please help us….
Please check the console for the error, definitely you will get your answer
Hi,
Can not write my card details this page. Please help us…
I thought you are passing wrong api auth key
Hello Sir, what happen once subcription expire, how we can manage payment cycle then?
You can manage a subscription by implementing a webhook so that your application gets to know when the subscription is expired, or the customer pays your bill or not.
hello sir ,
i am getting error like this , The resource ID cannot be null or whitespace.
I am facing sir issue but not getting solution.
Hello Sir,
I have just implemented everything in Laravel but payment form not loading, there is no error I am using actual stripe keys as well, could you please help me out it.
Note – My stripe account is fresh i didn’t activated it, I am assuming stripe should work without activation for sandbox mode.
I am getting this error, anyone can help me
At subscription routing –
The resource ID cannot be null or whitespace.
hello sir,
when I click on the pay button of the plan it gives me an error
“Call to a member function paymentMethods() on null”
I don’t know what I m doing wrong I use session not Laravel Auth
Thanks