Sometimes we want to create an app that is useful for all people living in different reason or locality and they want an application based on their native language. To achieve success in these new regions it is important to provide localization.
In this tutorial, we are going to build a React Native app that supports multiple languages by using the react-native-localize package.
We’ll be building a React Native app which will support English, French, and Arabic.
Add required libraries
Install react-native-localize by typing the following:
npm install react-native-localize

//After that we have to link this.
react-native link react-native-localize
The react-native-localize library gives you access to a lot of localization-related device constants but does not come with an i18n library.
We’ll use I18n.js to provide I18n translations to the JavaScript.
npm install i18n-js

//Since i18n-js does not seem to provides any cache/memoization we’ll use lodash.memoize for the same:

npm install lodash.memoize
Add translations
Create a translations directory inside src and then create three JSON files, one for each language.
- en.json for English
- fr.json for French
- ar.json for Arabic
These files contain the JSON object with keys and values.

The key will be the same for each language and will be used in the app to display text.
The value will be the text that we want to show to the user and will be different for each language.
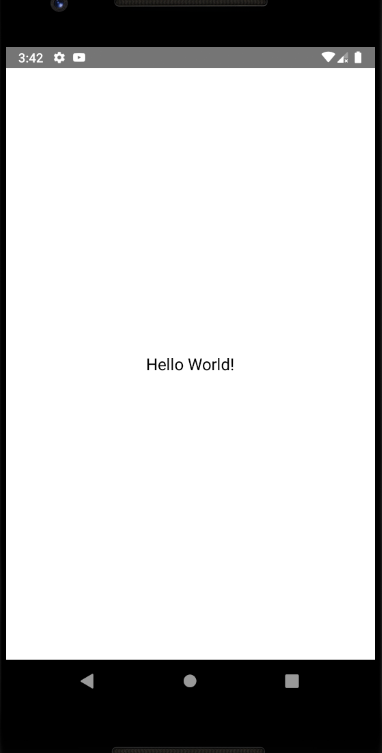
For English:
{
“hello”: “Hello World!”
}
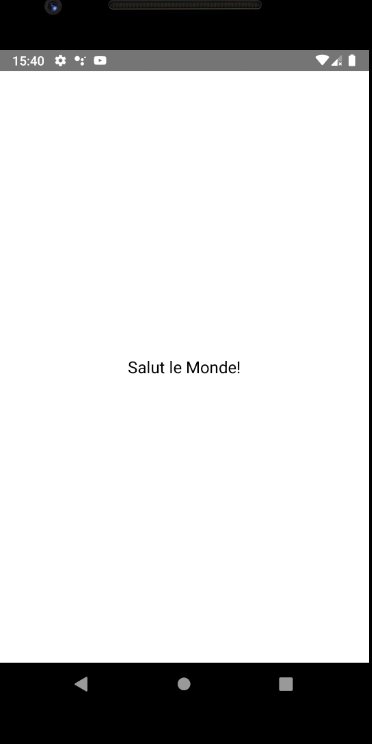
For French:
{
“hello”: “Salut le Monde!”
}
For Arabic:
{
“hello”: “أهلاً بالعالم”
}
Similarly, you can add more key-value pairs for every text that will be used in the app.
Add the Main Code
Open the App.js file and the following imports:
import React from "react";
import * as RNLocalize from "react-native-localize";
import i18n from "i18n-js";
import memoize from "lodash.memoize"; // Use for caching/memoize for better performance

import {
  I18nManager,
  SafeAreaView,
  ScrollView,
  StyleSheet,
  Text,
  View
} from "react-native";
After that, we’ll add some helper functions and constants that we’ll use later:
const translationGetters = {
  ar: () => require("./src/translations/ar.json"),
  en: () => require("./src/translations/en.json"),
  fr: () => require("./src/translations/fr.json")
};

const translate = memoize(
  (key, config) => i18n.t(key, config),
  (key, config) => (config ? key + JSON.stringify(config) : key)
);

const setI18nConfig = () => {
  // fallback if no available language fits
  const fallback = { languageTag: "en", isRTL: false };

  const { languageTag, isRTL } =
    RNLocalize.findBestAvailableLanguage(Object.keys(translationGetters)) ||
    fallback;

  translate.cache.clear();
  I18nManager.forceRTL(isRTL);
  i18n.translations = { [languageTag]: translationGetters[languageTag]() };
  i18n.locale = languageTag;
};
Now, we’ll create our App class component.
export default class App extends React.Component {
  constructor(props) {
    super(props);
    setI18nConfig(); // set initial config
  }

  componentDidMount() {
    RNLocalize.addEventListener("change", this.handleLocalizationChange);
  }

  componentWillUnmount() {
    RNLocalize.removeEventListener("change", this.handleLocalizationChange);
  }

  handleLocalizationChange = () => {
    setI18nConfig();
    this.forceUpdate();
  };

  render() {
    return (
      <SafeAreaView style={styles.safeArea}>
        <Text style={styles.value}>{translate("hello")}</Text>
      </SafeAreaView>
    );
  }
}

const styles = StyleSheet.create({
  safeArea: {
    backgroundColor: "white",
    flex: 1,
    alignItems: "center",
    justifyContent: "center"
  },
  value: {
    fontSize: 18
  }
});
In our constructor method, we called setI18nConfig() which will set the initial configuration.
Then in componentDidMount(), we’ll add an event listener which will listen for any changes and call handleLocalizationChange() if any changes occur.
The handleLocalizationChange() method fires setI18nConfig() and forceUpdate(). This is necessary for Android devices, as the component needs to be re-render for the changes to be visible.
We will remove the listener in componentWillUnmount() lifecycle method.
Finally, in the render() we’ll return hello by using translate() and passing the key as a parameter into it. It will then automatically figure out the language and the text that needs to be shown for that language.
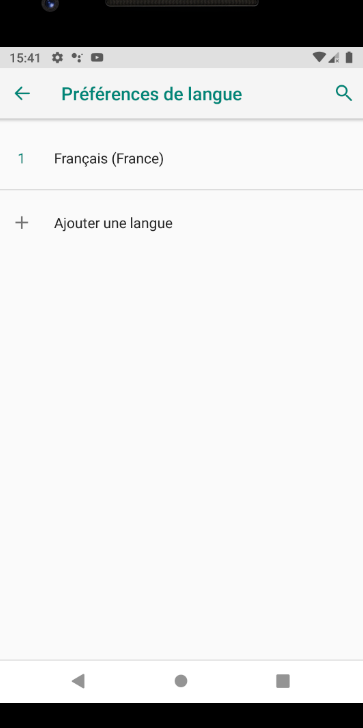
Change the language in your settings.