This section of the article discusses the steps that are required to set-up your environment for React development. You might feel that there are so many steps for this to get started but believe me, this will help you achieve faster development very soon.
You will require Node JS and NPM installed on your system to get the React JS development setup. Node JS is the platform that is required for the React development. After successful installation of both Node JS and NPM, then comes the part of installing React JS which can be done in two ways, and they are as follows:
Installing React JS using Webpack and Babel
Installing React JS using the Create-React-App command
Let us now look at each of these installation processes individually:
1. Installing React JS using Webpack and Babel:
Webpack is a module bundler which helps to manage and to load dependent modules and compiles them into a single file or bundle. This bundle can be used during your application development using either by the command line interface or by configuring in webpack.config file.
Babel, on the other hand, is a JavaScript compiler and transpiler which helps to convert one source code to another format. We are going to use this as this converts all your ES6 features in your code to ES5 format – so that it can be run on all browsers.
With the dependencies for the installation process handled and understood, let us get down to the business of (React JS) installation altogether.
- Create the root (ReactJS Application):
Create a folder naming ReactJS Application on the desktop to install the required software and dependencies. All of this will be done using the command-line way.
C:Users<Your Username>Desktop>mkdir ReactJSApplication
C:Users<Your Username>Desktop>cd ReactJSApplication
Module creation is controlled by the package.json file, and now that we have created the required folder, let us run the npm init commands to create the package.json file. This will ask for more details further, which can be skipped by padding a -y parameter to the previous command.
C:Users<Your Username>Desktop>ReactJSApplication>npm init -y- Install react and react-dom modules:
Since we need to install ReactJS, we need to install its dom packages using the install react and react-dom npm commands. The packages that we are installing now can be saved to the package.json file by adding the –save option in the commands above.
C:Users<Your Username>Desktop>ReactJSApplication>npm install react --save
C:Users<Your Username>Desktop>ReactJSApplication>npm install react-dom --save
Instead of two different commands, if you want to combine these commands into a single command – It can be done this way:
C:UsersDesktop>ReactJSApplication>npm install react react-dom --save- Install webpack modules:
After the react and react-dom modules are installed, it is time to install the webpack modules, which can be done in either ways. The installation here requires to install all the three Webpack modules namely webpack, webpack-dev-server and webpack-cli.
C:Users<Your Username>Desktop>ReactJSApplication>npm install webpack --save
C:Users<Your Username>Desktop>ReactJSApplication>npm install webpack-dev-server --save
C:Users<Your Username>Desktop>ReactJSApplication>npm install webpack-cli --save
Or we can install all of these modules at once using just this single command as shown below:
C:Users<Your Username>Desktop>ReactJSApplication>npm install webpack webpack-dev-server webpack-cli --save- Install Babel modules:
After the installation of webpack modules, we need to install all the 5 babel dependencies namely babel-loader, babel-core, babel-preset-dev, html-webpack-plugin and babel-preset-react. Identify the difference below, as we are going to save these dependencies as only development required dependencies.
C:Users<Your Username>Desktop>ReactJSApplication>npm install babel-core --save-dev C:Users<Your Username>Desktop>ReactJSApplication>npm install babel-loader --save-dev C:Users<Your Username>Desktop>ReactJSApplication>npm install babel-preset-env --save-dev
C:Users<Your Username>Desktop>ReactJSApplication>npm install babel-preset-react --save-dev
C:Users<Your Username>Desktop>ReactJSApplication>npm install html-webpack-plugin --save-dev
All of these modules can be installed at once using just this in a single command, like the following:
C:Users<Your Username>Desktop>ReactJSApplication>npm install babel-core babel-loader babel-preset-env babel-preset-react html-webpack-plugin --save-devC:Users<Your Username>Desktop>ReactJSApplication>npm i @babel/core babel-loader @babel/preset-env @babel/preset-react --save-dev- Create the necessary files:
There is a requirement to create a certain set of files either manually or using the command prompt, which will finally mark the installation process complete. The files that need to be created are shown below:
C:Users<Your Username>Desktop>ReactJSApplication>type nul > index.html
C:Users<Your Username>Desktop>ReactJSApplication>type nul > App.js
C:Users<Your Username>Desktop>ReactJSApplication>type nul > main.js
C:Users<Your Username>Desktop>ReactJSApplication>type nul > webpack.config.js C:Users<Your Username>Desktop>ReactJSApplication>type nul > .babelrc- Set the Compiler, Server Loaders respectively:
Open the webpack.config.js using Notepad++ or Visual Code, add the following code snippet given below. By this change, we would be setting the webpack entry point as main.js, and output path will be the path where the bundle application will be served, and development port is set to 8001 which can be changed to any port of your choice (but it should be open for use).
Webpack.config.js
const path = require('path');
const HtmlWebpackPlugin = require('html-webpack-plugin');

module.exports = {
   entry: './main.js',
   output: {
      path: path.join(__dirname, '/bundle'),
      filename: 'index_bundle.js'
   },
   devServer: {
      inline: true,
      port: 8080
   },
   module: {
      rules: [
         {
            test: /.jsx?$/,
            exclude: /node_modules/,
            loader: 'babel-loader',
            query: {
               presets: ['es2015', 'react']
            }
         }
      ]
   },
   plugins:[
      new HtmlWebpackPlugin({
         template: './index.html'
      })
   ]
}
Once the above change is done, open package.json in Notepad++ or Visual Code and delete the test, echo, and exit 1 entries under the scripts object. This is not required as we wouldn’t be doing any testing in this section after this installation, but add start and build commands instead.
We would then require to import this React component and then render this in our root App element, just so that we can watch it on our browser. This change is required in main.js file.
import React from 'react';
import ReactDOM from 'react-dom';
import App from './App.js';
ReactDOM.render(<App />, document.getElementById('app'));
A simple thing that one should remember is that whichever component that you as a user want to work with, import it and when you want to use one of the created components – you would want to export and import in the file where you want and then use. For such a thing to happen, the following entry should go and sit in the .package,json file that we created sometime back.Remove the test data and this data in the script portion.
"start": "webpack-dev-server --mode development --open --hot","build": "webpack --mode production"Changes required to setup the index.html, App.js and main.js:
index.html is a regular HTML file. Here, we are adding the following code div id = “app” to mark it as the root element and also we will be adding index_bundle.js script, to mark that is our bundled application.
<!DOCTYPE html>
<html lang = "en">
<head>
<meta charset = "UTF-8">
<title>React App</title>
</head>
<body>
<div id = "app"></div>
<script src = 'index_bundle.js'></script>
</body>
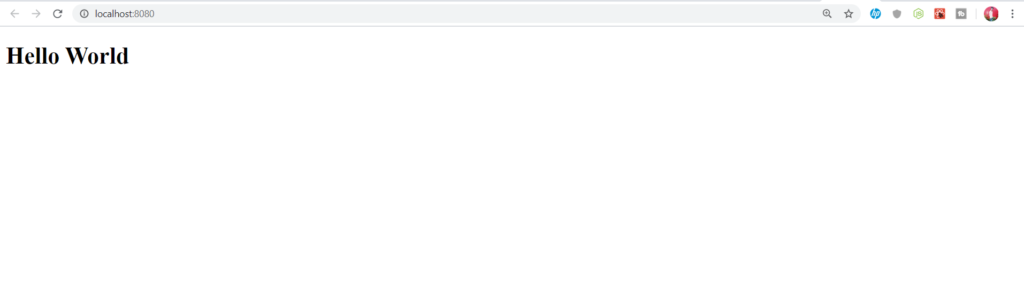
</html>App.js is our first React component which will render a simple Hello, World message on successfully starting the React server.
import React, { Component } from 'react';
class App extends Component{
   render(){
      return(
         <div>
            <h1>Hello World</h1>
         </div>
      );
   }
}
export default App;
We would then require to import this React component and then render this in our root App element, just so that we can watch it on our browser. This change is required in main.js file.
import React from 'react';
import ReactDOM from 'react-dom';
import App from './App.js';
ReactDOM.render(<App />, document.getElementById('app'));
A simple thing that one should remember is that whichever component that you as a user want to work with, import it and when you want to use one of the created components – you would want to export and import in the file where you want and then use. For such a thing to happen, the following entry should go and sit in the .babelrc file that we created sometime back.
{
  "presets": ["@babel/preset-env", "@babel/preset-react"]
}
Running the React Server:
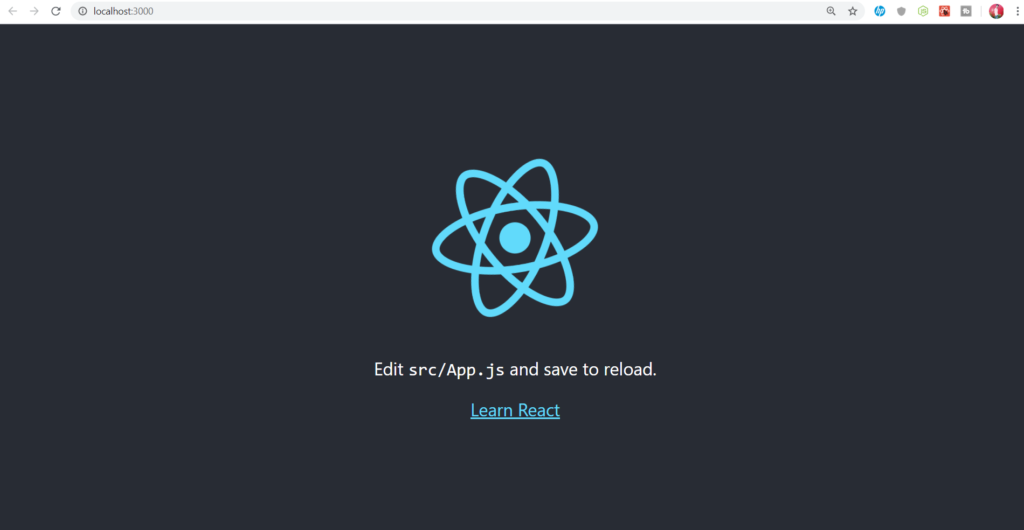
The steps until now should ideally complete the installation of React on your system and for us to test it, we need to start the React server using this command:
C:Users<Your Username>DesktopReactJSApplication>npm startThis shows the port that we used to open in your favourite browser, and once when we open, it shows something similar to the following (which confirms your React setup is all done without any issues):
If you want to generate the bundle file, then you will have to execute the build command as like this (this will generate the bundle under the bundle folder of the installation directory):
C:Users<Your Username>DesktopReactJSApplication>npm run build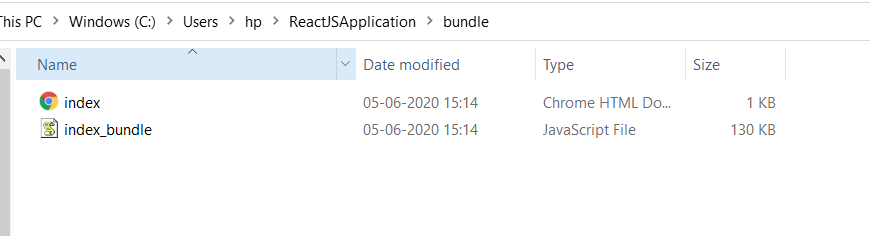
2. Install via the create-react-app command:
React can also be installed using the create-react-app command which is far more easy than what we have seen earlier (with Webpack and Babel dependencies). Let us dig into the installation process now:
- Install the create-react-app package:
The installation process doesn’t change much when it comes with npm, take a look at the command below:
C:Users<Your Username>Desktop>npx create-react-app myapplication
cd myapplication
npm start