CRUD Operations in MVC
This article is all about ASP.NET MVC CRUD operations using Entity Data Model (DB First Approach). This will explain it in baby steps using images. I have also attached a video where you can find the whole things in detail. Basically, this CRUD operation is a part of a project which is a School Management Software. So you can watch that video also.
Lets start.
CRUD means Create Read Update Delete.
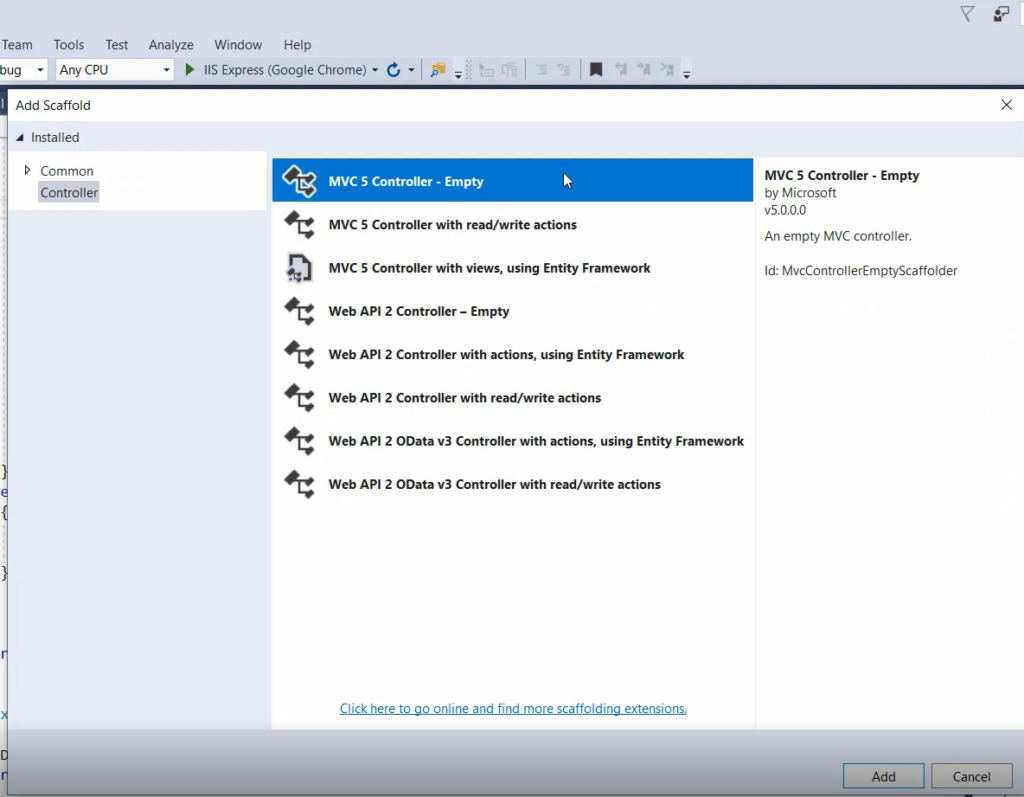
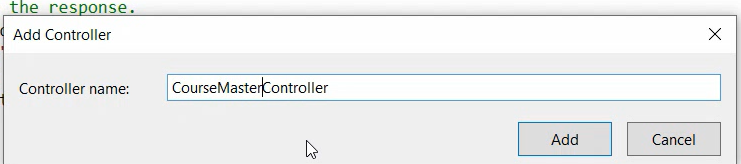
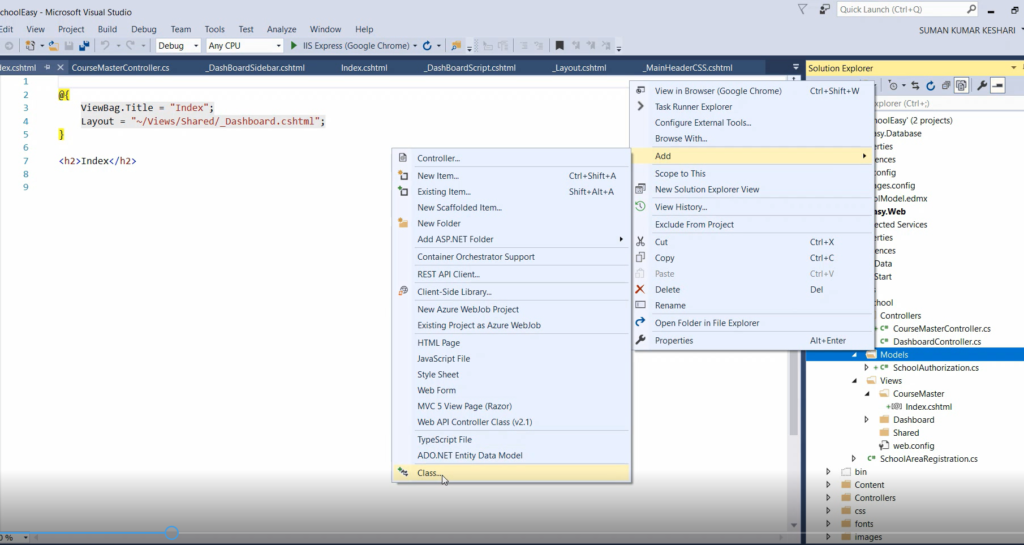
Add Course Controller.
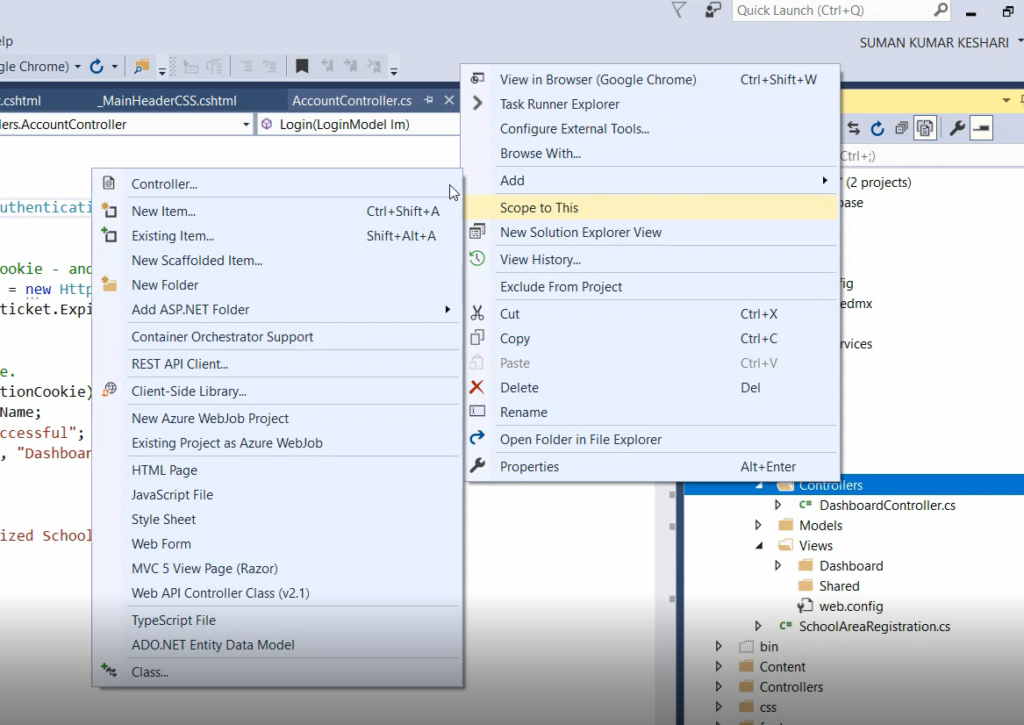
Just Right Click on the Controller and then Add the Controller which is highlighted in the image below.
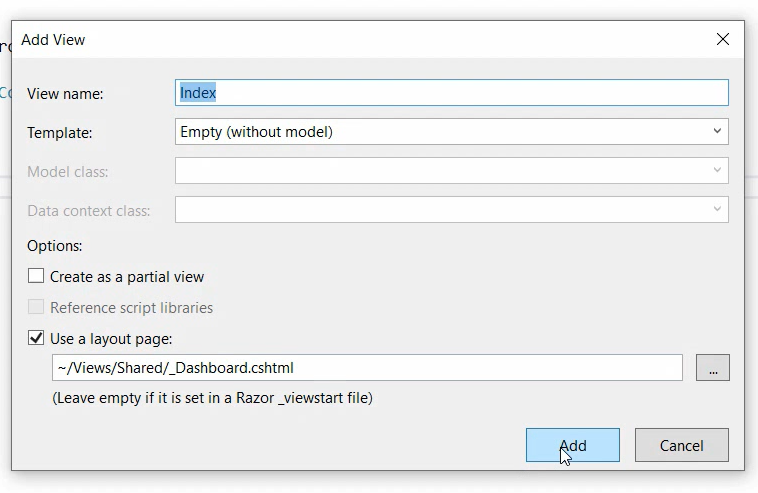
An Index Action Method is added when you add the Controller.

Adding a View for this Action Method by right Clicking in the Action Method block.
Then we add a model on the model folder.Basically model is a class where we can define different properties and methods.Where we write the business logics.
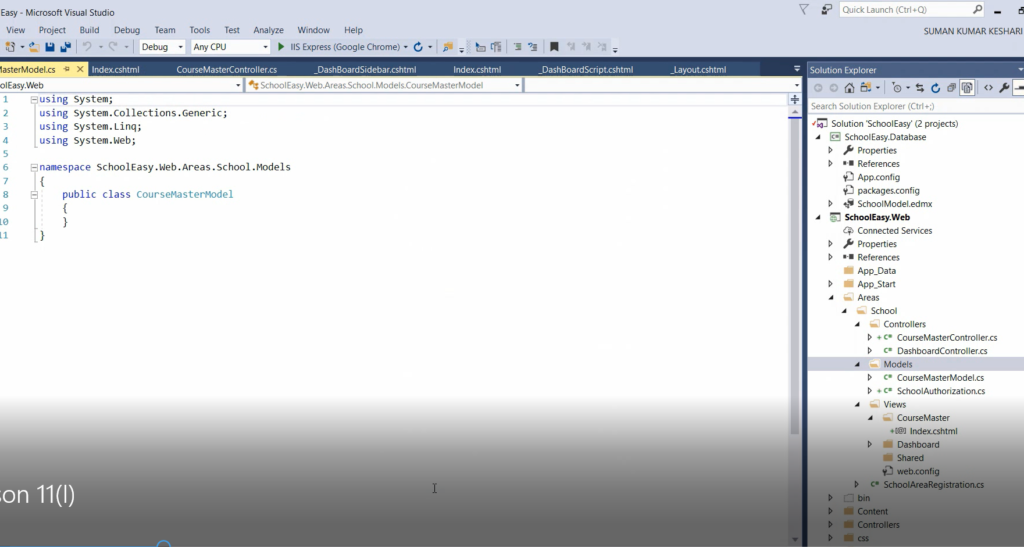
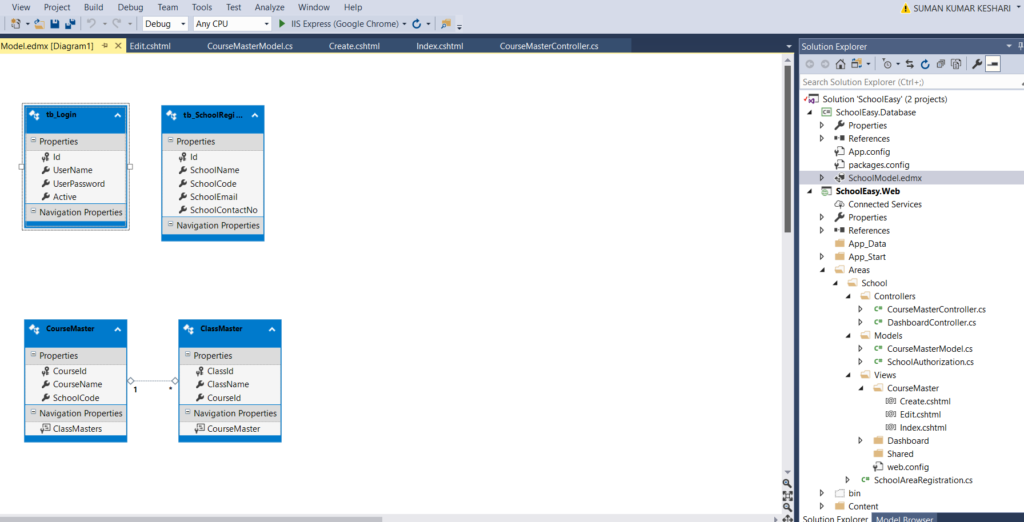
Then after i have also added my edmx file where i attach my database and i have also created a database in that database i have added a table CourseMaster.

After that i started writing the code for the CourseMaster model.
namespace SchoolEasy.Web.Areas.School.Models
{
    public class CourseMasterModel
    {
        public int CourseId { get; set; }
        public string CourseName { get; set; }
        public List<Courses> CourseList { get; set; }
    }

    public class Courses
    {
        public int CourseId { get; set; }
        public string CourseName { get; set; }
    }
}
After that I start coding in the Index Action Method for getting the saved data from the database which is basically the READ part of the CRUD. In which SchoolAppEntities db = new SchoolAppEntities() is the entity part which generate a connection between the database.
 SchoolAppEntities db = new SchoolAppEntities();

public ActionResult Index()
        {
            CourseMasterModel model = new CourseMasterModel();
            string SchoolCode = Convert.ToString(Session["SchoolCode"]);
            var courselist = (from p in db.CourseMasters
                              where p.SchoolCode == SchoolCode
                              select new Courses
                              { CourseId = p.CourseId,
                                CourseName = p.CourseName
                              }).ToList();
            model.CourseList = courselist;
            return View(model);
        }
After that we write some code for the view.
@model SchoolEasy.Web.Areas.School.Models.CourseMasterModel
@{
    ViewBag.Title = "Index";
    Layout = "~/Views/Shared/_Dashboard.cshtml";
}
<section class="content">
    <div class="row">
        <div class="col-xs-12">
            <div class="box">
                <div class="box-header">
                    <h3 class="box-title">Course List</h3>
                    <div class="box-tools">
                        <div class="input-group input-group-sm hidden-xs" style="width: 150px;">
                            <div class="input-group-btn">
                                <a href="@Url.Action("Create","CourseMaster",new { area = "School"})" class="btn btn-block btn-info">Create Course</a>
                            </div>
                        </div>
                    </div>
                </div>
                <!-- /.box-header -->
                <div class="box-body table-responsive no-padding">
                    <table class="table table-hover">
                        <thead>
                            <tr>
                                <th>Course Name</th>
                                <th>Action</th>
                            </tr>
                        </thead>
                        <tbody>
                            @for (int i = 0; i < Model.CourseList.Count; i++)
                            {
                                <tr>
                                    <td>@Html.DisplayFor(model=>model.CourseList[i].CourseName)</td>
                                    <td>
                                        <a href="@Url.Action("Edit","CourseMaster",new { area = "School",CourseId=Model.CourseList[i].CourseId})" class="btn btn-warning"><i class="fa fa-pencil"></i></a>
                                        <a href="@Url.Action("Delete","CourseMaster",new { area = "School",CourseId=Model.CourseList[i].CourseId})" class="btn btn-danger"><i class="fa fa-trash"></i></a>
                                    </td>
                                </tr>
                            }
                        </tbody>
                    </table>
                </div>
                <!-- /.box-body -->
            </div>
            <!-- /.box -->
        </div>
    </div>
    <!-- /.row -->
</section>
<script>
    $(document).ready(function () {
        var unauthorized = '@TempData["message"]';
        if (unauthorized != "") {
            swal(unauthorized, "", "success");
        }
        else {

        }

    });
</script>
After that we add a Create Action Method for the Creation or Insertion of Course in the Database. This is CREATE part of the CRUD.
        public ActionResult Create()
        {
            CourseMasterModel model = new CourseMasterModel();
            return View(model);
        }
Then we add a view for the Create same as that of the Index Action Method.
@model SchoolEasy.Web.Areas.School.Models.CourseMasterModel
@{
    ViewBag.Title = "Create";
    Layout = "~/Views/Shared/_Dashboard.cshtml";
}

<section class="content">
    <div class="row">
        <!-- left column -->
        <div class="col-md-6">
            <!-- general form elements -->
            <div class="box box-primary">
                <div class="box-header with-border">
                    <h3 class="box-title">Course Master</h3>
                </div>
                <!-- /.box-header -->
                <!-- form start -->
                @using (Html.BeginForm("Create", "CourseMaster", new { area = "School" }, FormMethod.Post))
                {
                @Html.AntiForgeryToken()
                <div class="box-body">
                    <div class="form-group">
                        <label>Course Name</label>
                        @Html.EditorFor(m => m.CourseName, new { htmlAttributes = new { @placeholder = "Enter Course Name" } })
                        @Html.ValidationMessageFor(m => m.CourseName, "", new { @class = "text-danger" })
                    </div>
                </div>
                <!-- /.box-body -->
                <div class="box-footer">
                    <button type="submit" class="btn btn-primary">Save</button>
                    <a href="@Url.Action("Index","CourseMaster",new { area = "School"})" class="btn bg-maroon margin">Back to List</a>
                </div>
                }
            </div>
            <!-- /.box -->
        </div>
        <!--/.col (left) -->
    </div>
    <!-- /.row -->
</section>
After that if the user enter some data in that fields and press the submit button then all the data is posted to the Create Action Post method.
[HttpPost]
public ActionResult Create(CourseMasterModel model)
{
if(ModelState.IsValid)
{
string SchoolCode = Convert.ToString(Session["SchoolCode"]);
CourseMaster courseMaster = new CourseMaster();
courseMaster.CourseName = model.CourseName;
courseMaster.SchoolCode = SchoolCode;
db.CourseMasters.Add(courseMaster);
db.SaveChanges();
TempData["message"] = "Data Saved Successfully";
}
else
{
TempData["message"] = "Validation Error";
}
return RedirectToAction("Index");
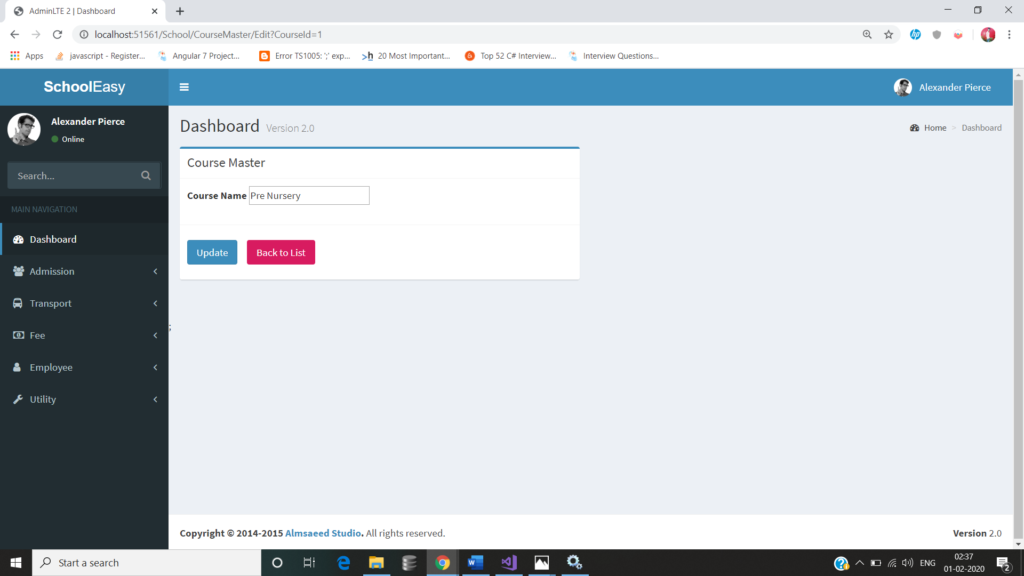
}Then if we want to Edit some data then we use to click the button on the Index View which is like a Pencil.After Clicking that button I bind the data to the respective fields.
 public ActionResult Edit(int CourseId)
        {
            CourseMasterModel model = new CourseMasterModel();
            var Course = db.CourseMasters.Where(x => x.CourseId == CourseId).FirstOrDefault();
            model.CourseId=Course.CourseId;
            model.CourseName = Course.CourseName;
            return View(model);
        }
This is the Edit View Code where we can update the older data by submitting the button. This is UPDATE part of the CRUD.
@model SchoolEasy.Web.Areas.School.Models.CourseMasterModel
@{
    ViewBag.Title = "Edit";
    Layout = "~/Views/Shared/_Dashboard.cshtml";
}

<section class="content">
    <div class="row">
        <!-- left column -->
        <div class="col-md-6">
            <!-- general form elements -->
            <div class="box box-primary">
                <div class="box-header with-border">
                    <h3 class="box-title">Course Master</h3>
                </div>
                <!-- /.box-header -->
                <!-- form start -->
                @using (Html.BeginForm("Edit", "CourseMaster", new { area = "School" }, FormMethod.Post))
                {
                    @Html.AntiForgeryToken()
                    @Html.HiddenFor(m=>m.CourseId)
                    <div class="box-body">
                        <div class="form-group">
                            <label>Course Name</label>
                            @Html.EditorFor(m => m.CourseName, new { htmlAttributes = new { @placeholder = "Enter Course Name" } })
                            @Html.ValidationMessageFor(m => m.CourseName, "", new { @class = "text-danger" })
                        </div>
                    </div>
                    <!-- /.box-body -->
                    <div class="box-footer">
                        <button type="submit" class="btn btn-primary">Update</button>
                        <a href="@Url.Action("Index","CourseMaster",new { area = "School"})" class="btn bg-maroon margin">Back to List</a>
                    </div>
                }
            </div>
            <!-- /.box -->
        </div>
        <!--/.col (left) -->
    </div>
    <!-- /.row -->
</section>
After Clicking the submit button then data is posted in this action method.
[HttpPost]
public ActionResult Edit(CourseMasterModel model)
{
if (ModelState.IsValid)
{
string SchoolCode = Convert.ToString(Session["SchoolCode"]);
CourseMaster courseMaster = db.CourseMasters.Find(model.CourseId);
courseMaster.CourseName = model.CourseName;
db.Entry(courseMaster).State=System.Data.Entity.EntityState.Modified;
db.SaveChanges();
TempData["message"] = "Data Updated Successfully";
}
else
{
TempData["message"] = "Validation Error";
}
return RedirectToAction("Index");
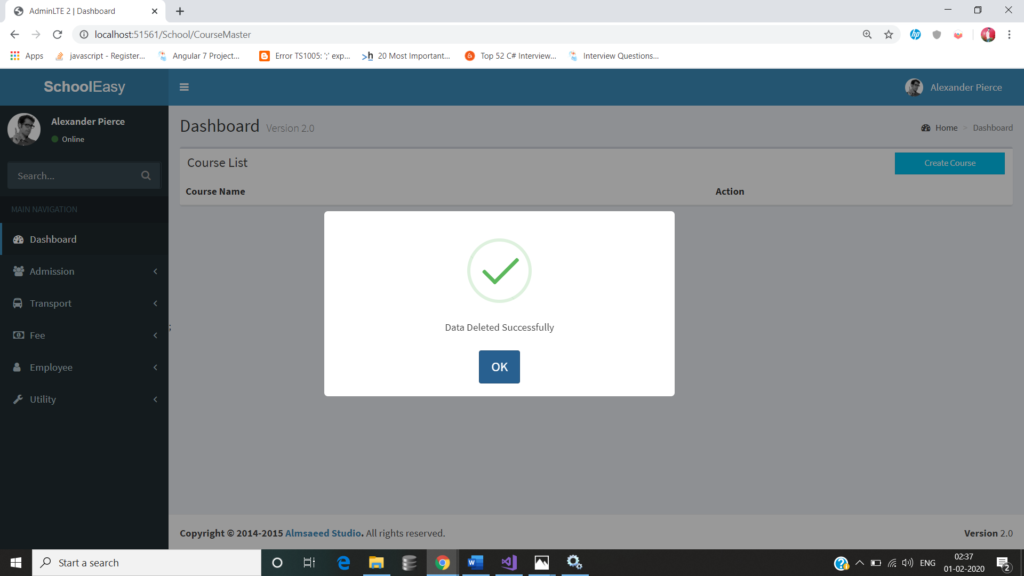
}After that if user want to delete the data then we add a button like trash in the Index View in which user can click that button and want to delete the respective data.
public ActionResult Delete(int CourseId)
{
if (ModelState.IsValid)
{
CourseMaster courseMaster = db.CourseMasters.Find(CourseId);
db.Entry(courseMaster).State = System.Data.Entity.EntityState.Deleted;
db.SaveChanges();
TempData["message"] = "Data Deleted Successfully";
}
else
{
TempData["message"] = "Validation Error";
}
return RedirectToAction("Index");
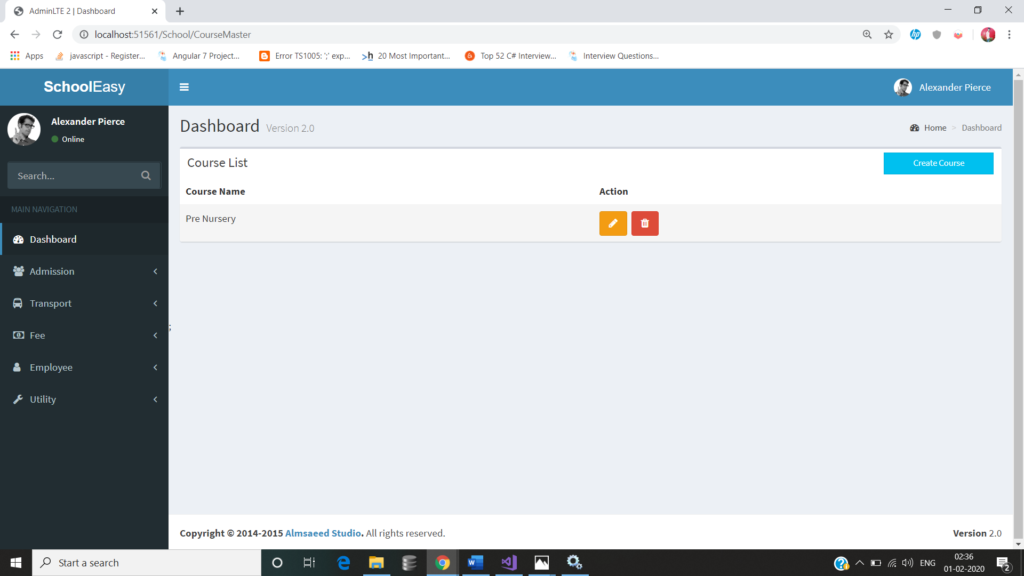
}Images shown below are the final result after writing all the above code.

If you found this post interesting then you can check the below video link for more knowledge.