In this post, we go through a tutorial on how to create custom validation in a web application using both MVC and Web API 2.0.
Data validation in an application is one of the major tasks for the developer now-a-days. Data validation is the process of ensuring that the data entered by any users is correct and is useful. It uses routines, often called validation rules, validation constraints or check routines, which check for the correctness, meaningfulness, and security of data, that gets put into a web application. These rules are mainly implemented in UI, business logic, and databases.
If we check in any web application, we will mainly find validations in the UI. As the user interface is the primary source, where the user can enter invalid data in the application, we mainly focus on UI validation.
In MVC, we have data notation attributes, which will ensure data integrity while it’s being entered in.
All data annotation attributes are included in the System.ComponentModel.DataAnnotations namespace. Various data annotation attributes give you a simple way to perform validations on model data. These attributes are helpful for the common validation patterns like Required, Range, StringLength, etc.
It can perform the validation on both the client- and server-side of an application.

The main Data Validation attributes are given below.
- Required – It ensures that the value must be provided to the model property.
- Range – The data should be in a specific range, for example, age should not be between 1 to 18.
- StringLength – You can specify the minimum and maximum length of a property’s value.
- Compare – It is used to compare one property value with another.
- Regular Expression – The value should match regular expressions, e.g. E-mail, phone, URL, etc.
However, sometimes when a validator fails to validate certain business rules, we require custom validation for custom business rules. So, we will see how we can implement these in an MVC application.
Example in MVC
Here, I have a model, as shown below.
public class RegisterViewModel
   {
       [Required]
       [EmailAddress]
       [Display(Name = "Email")]
       public string Email { get; set; }
       [Required]
       [StringLength(100, ErrorMessage = "The {0} must be at least {2} characters long.", MinimumLength = 6)]
       [DataType(DataType.Password)]
       [Display(Name = "Password")]
       public string Password { get; set; }
       [Required(ErrorMessage ="First Name is Required")]
       public string FirstName { get; set; }
       [Required(ErrorMessage = "Last Name is Required")]
       public string LastName { get; set; }
       public string Country { get; set; }
   }
Thus, I have a country property. Here, I want to implement the validation. The application should accept only these 3 countries: India, Pakistan, Nepal.
As of now, I don’t find any validation attributes which will fulfill my requirement, so I will go for Custom Validation.
Before implementing Custom Validation, we should know about a class, i.e. ValidationAttribute.
The ValidationAttribute class is an abstract class, which contains the IsValid virtual method. The IsValid method takes the value and ValidationContext object as the input parameters.
Value represents the value of the model property for which this Custom Validation applies. ValidationContext describes the context in which validation check is performed.
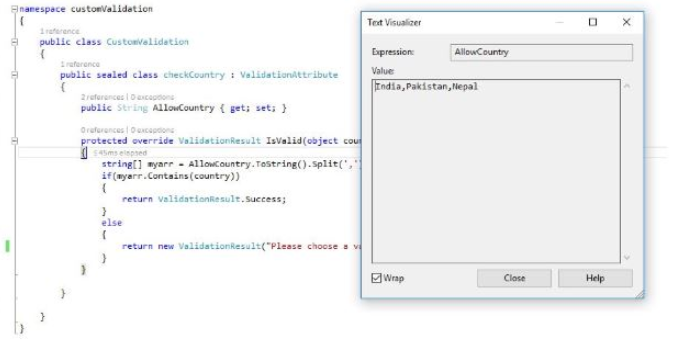
Thus, for this custom validation, add a new class called checkCountry as shown below and derive it from the ValidationAttribute class.
    {
        public sealed class checkCountry : ValidationAttribute
        {
            public String AllowCountry { get; set; }
            protected override ValidationResult IsValid(object country, ValidationContext validationContext)
            {
                string[] myarr = AllowCountry.ToString().Split(',');
                if(myarr.Contains(country))
                {
                    return ValidationResult.Success;
                }
                else
                {
                    return new ValidationResult("Please choose a valid country eg.(India,Pakistan,Nepal");
                }
            }
        }
    }
Now, use the namespace given below and modify the model, as shown below.
using System.ComponentModel.DataAnnotations;
using static customValidation.CustomValidation
Now, you have the attribute checkCountry in the model property, as shown.
[checkCountry(AllowCountry ="India,Pakistan,Nepal",ErrorMessage = ("Please choose a valid country eg.(India,Pakistan,Nepal")]
       public string Country { get; set; }
Now, add the details given below and click Register in View.
@model customValidation.Models.RegisterViewModel
@{
//ViewBag.Title = "Register";
}
<h2>@ViewBag.Title.</h2>
@using (Html.BeginForm("Register", "Account", FormMethod.Post, new { @class = "form-horizontal", role = "form" }))
{
@Html.AntiForgeryToken()
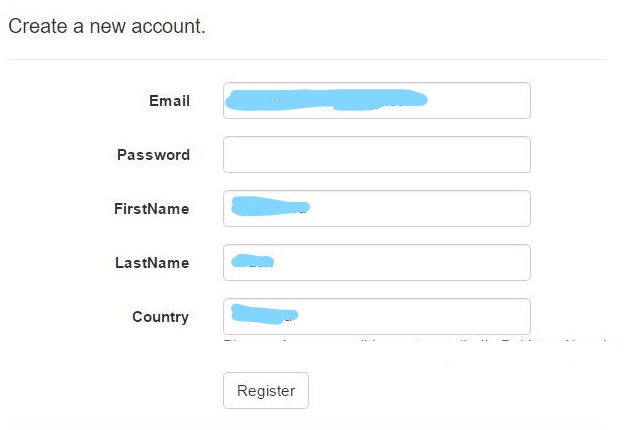
<h4>Create a new account.</h4>
<hr />
@*@Html.ValidationSummary("", new { @class = "text-danger" })*@
<div >
<div class="form-group" >
@Html.LabelFor(m => m.Email, new { @class = "col-md-2 control-label" })
<div class="col-md-10">
@Html.TextBoxFor(m => m.Email, new { @class = "form-control" })
@Html.ValidationMessageFor(model => model.Email,null, new { @class = "text-danger" })
</div>
</div>
<div class="form-group">
@Html.LabelFor(m => m.Password, new { @class = "col-md-2 control-label" })
<div class="col-md-10">
@Html.PasswordFor(m => m.Password, new { @class = "form-control" })
@Html.ValidationMessageFor(model => model.Password, null, new { @class = "text-danger" })
</div>
</div>
<div class="form-group">
@Html.LabelFor(m => m.FirstName, new { @class = "col-md-2 control-label" })
<div class="col-md-10">
@Html.TextBoxFor(m => m.FirstName, new { @class = "form-control" })
@Html.ValidationMessageFor(model => model.FirstName, null, new { @class = "text-danger" })
</div>
</div>
<div class="form-group">
@Html.LabelFor(m => m.LastName, new { @class = "col-md-2 control-label" })
<div class="col-md-10">
@Html.TextBoxFor(m => m.LastName, new { @class = "form-control" })
@Html.ValidationMessageFor(model => model.LastName, null, new { @class = "text-danger" })
</div>
</div>
<div class="form-group">
@Html.LabelFor(m => m.Country, new { @class = "col-md-2 control-label" })
<div class="col-md-10">
@Html.TextBoxFor(m => m.Country, new { @class = "form-control" })
@Html.ValidationMessageFor(model => model.Country, null, new { @class = "text-danger" })
</div>
</div>
<div class="form-group">
<div class="col-md-offset-2 col-md-10">
<input type="submit" class="btn btn-default" value="Register" />
</div>
</div>
</div>
}
@section Scripts {
@Scripts.Render("~/bundles/jqueryval")
}Now, just put a breakpoint in and check the execution.
Not, it will check if the entered county is present in allowCountry by splitting the string, if not, then it will return an error message.
// POST: /Account/Register
       [HttpPost]
       [AllowAnonymous]
       [ValidateAntiForgeryToken]
       public async Task<ActionResult> Register(RegisterViewModel model)
       {
           if (ModelState.IsValid)
           {
               var user = new ApplicationUser { UserName = model.Email, Email = model.Email };
               var result = await UserManager.CreateAsync(user, model.Password);
               if (result.Succeeded)
               {
                   await SignInManager.SignInAsync(user, isPersistent:false, rememberBrowser:false);
                   return RedirectToAction("Index", "Home");
               }
               AddErrors(result);
           }
           // If we got this far, something failed, redisplay form
           return View(model);
       }
When we enter Srilanka this ModelState.IsValid returns false because it doesnot fulfill the validations.And below output is produced.
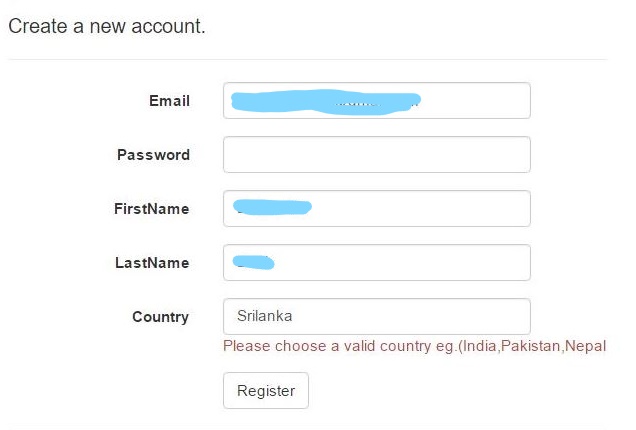
In this way, we can create our own validation attributes and can use them in the project.
And Same this is applied when you are working with the WebApi project.