When the user presses the Android hardware back button in React Native, react-navigation will pop a screen or exit the app if there are no screens to pop. This is the sensible default behavior, but there are situations when you might want to implement custom handling. This is where handling the android back button is useful.
Suppose if you open a form and enter some data and after that if you accidentally press the back button than you lost all the data so if you applied some backbutton handler in that form than you can easily overcome this. So in that case we use Android Back Button.
To handle the Android Back Button Press in the React Native we have to register the hardwareBackPress event listener with a callback function, which will be called after pressing the Back Button. We should also remove the listener when we are jumping out from the screen (where we have added the listener) because sometimes after going to the next screen or any other screen the listener remains active in the background if the last screen is in the stack and not killed by the system.
The event subscriptions are called in reverse order (i.e. last registered subscription first), and if one subscription returns true then subscriptions registered earlier will not be called.
For adding – BackHandler.addEventListener(‘hardwareBackPress’, this.handleBackButtonClick);
For removing – BackHandler.removeEventListener(‘hardwareBackPress’, this.handleBackButtonClick);
Some of you might think about that why we can’t use React Native Life Cycle in this matter. Let me clear you about this you may be inclined to use componentDidMount to subscribe for the back press event and componentWillUnmount to unsubscribe. The reason, why we do not use them, is that they are not generally called when entering or leaving a screen.
More specifically, consider a StackNavigator with screens A and B. After navigating to A, its componentDidMount is called. When pushing B, its componentDidMount is also called, but A remains mounted and its componentWillUnmount is therefore not called. That’s why we can’t use this. So move to the example and i will show you how you can use backhandler.
As we know it is the part of React Navigation so we have to install the required react-navigation@3.11.1 package.
Install react-navigation dependency to import createAppContainer. If you install react-navigation@3.11.1 then createStackNavigator present inside the react-navigation. Otherwise you have to install independently other dependencies.
npm install react-navigation –save
Other supporting libraries for react-navigation
npx npm install react-native-gesture-handler react-native-safe-area-context @react-native-community/masked-view react-native-screens react-native-reanimated –save
CocoaPods Installation
Please use the following command to install CocoaPods
cd ios && pod install && cd ..
App.js code
import React, { Component } from 'react';

import { createAppContainer ,createStackNavigator} from 'react-navigation';

import Screen1 from './pages/Screen1';
import Screen2 from './pages/Screen2';
import Screen3 from './pages/Screen3';

const App = createStackNavigator({
  //Constant which holds all the screens like index of any book
  Screen1: { screen: Screen1 },
    //First entry by default be our first screen if we do not define initialRouteName
    Screen2: { screen: Screen2 },
    Screen3: { screen: Screen3 },
  },
  {
    initialRouteName: 'Screen1',
  }
);
export default createAppContainer(App);
Screen1.js
import React, { Component } from 'react';
import { StyleSheet, View, Button, TextInput} from 'react-native';
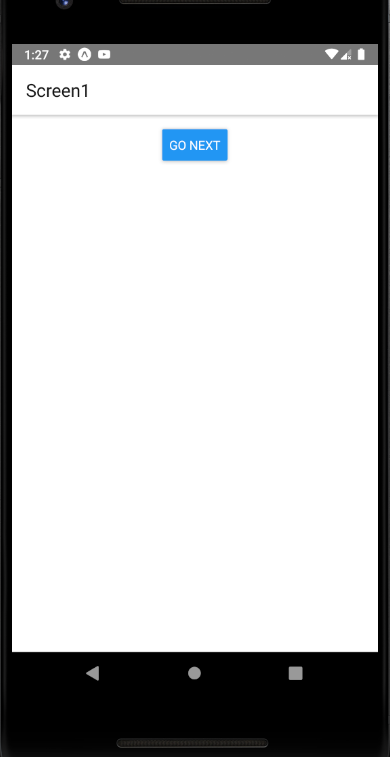
export default class Screen1 extends Component {
static navigationOptions = {
title: 'Screen1',
};
render() {
const { navigate } = this.props.navigation;
return (
<View style={styles.container}>
<Button title='Go next'
onPress={() =>navigate('Screen2')}
/>
</View>
);
}
}
const styles = StyleSheet.create({
container: {
flex: 1,
backgroundColor: '#fff',
alignItems: 'center',
padding:16
},
});Screen2.js
import React, { Component } from 'react';
import { StyleSheet, View, Text ,BackHandler } from 'react-native';
export default class Screen2 extends Component {
constructor(props) {
super(props)
//Binding handleBackButtonClick function with this
this.handleBackButtonClick = this.handleBackButtonClick.bind(this);
}
componentDidMount() {
// This is the first method in the activity lifecycle
// Addding Event Listener for the BackPress
BackHandler.addEventListener('hardwareBackPress', this.handleBackButtonClick);
}
componentWillUnmount() {
// This is the Last method in the activity lifecycle
// Removing Event Listener for the BackPress
BackHandler.removeEventListener('hardwareBackPress', this.handleBackButtonClick);
}
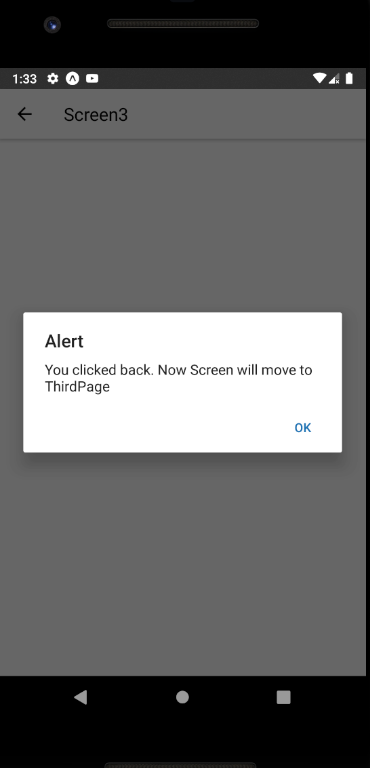
handleBackButtonClick() {
// Registered function to handle the Back Press
// We are generating an alert to show the back button pressed
alert('You clicked back. Now Screen will move to Screen3');
// We can move to any screen. If we want
this.props.navigation.navigate('Screen3');
// Returning true means we have handled the backpress
// Returning false means we haven't handled the backpress
return true;
}
static navigationOptions = {
//Setting the header of the screen
title: 'Screen2',
};
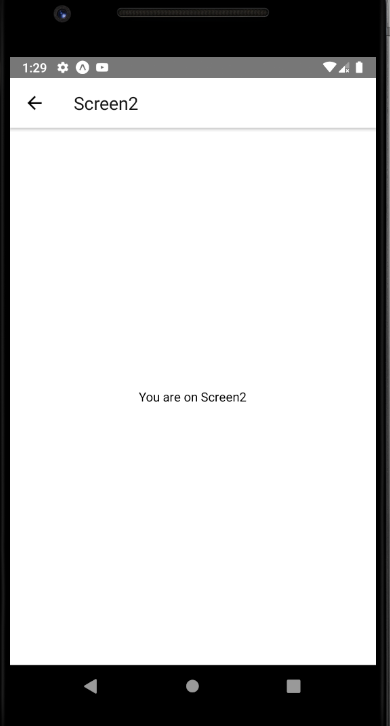
render() {
const { navigate } = this.props.navigation;
return (
<View style={styles.container}>
<Text>
You are on Screen2
</Text>
</View>
);
}
}
const styles = StyleSheet.create({
container: {
flex: 1,
backgroundColor: '#fff',
alignItems: 'center',
justifyContent: 'center',
},
});Screen3.js
import React, { Component } from 'react';
import { StyleSheet, View, Text ,BackHandler } from 'react-native';

export default class Screen3 extends Component {
  constructor(props) {
    super(props)
    //Binding handleBackButtonClick function with this
    this.handleBackButtonClick = this.handleBackButtonClick.bind(this);
  }
  componentDidMount() {
    // This is the first method in the activity lifecycle
    // Addding Event Listener for the BackPress
    BackHandler.addEventListener('hardwareBackPress', this.handleBackButtonClick);
  }
  componentWillUnmount() {
    // This is the Last method in the activity lifecycle
    // Removing Event Listener for the BackPress
    BackHandler.removeEventListener('hardwareBackPress', this.handleBackButtonClick);
  }
  handleBackButtonClick() {
    // Registered function to handle the Back Press
    // To popup the default screen while going back you can use goBack
    this.props.navigation.goBack(null);
    // To exit from your App you can use BackHandler.exitApp();.
    // Just comment the above line and uncomment the below to use it
    //BackHandler.exitApp();
    // Returning true means we have handled the backpress
    // Returning false means we haven't handled the backpress
    // Try to make it false also
    return true;
  }
  static navigationOptions = {
    title: 'Screen3',
    //Sets Header text of Status Bar
  };
  render() {
    const { navigate } = this.props.navigation;
    return (
      <View style={styles.container}>
        <Text>
          You are on Screen3
        </Text>
      </View>
    );
  }
}
const styles = StyleSheet.create({
  container: {
    flex: 1,
    backgroundColor: '#fff',
    alignItems: 'center',
    justifyContent: 'center',
  },
});