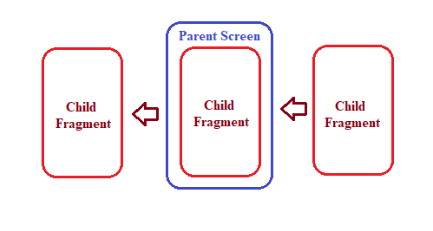
In react naive there is no same component available like Fragment but using some tweak we can easily create Fragment like interface in react native. In a developer worlds fragment is like a Custom child view in single activity screen. There can be multiple fragments in single screen with multiple objectives. In this post, you will see How to Make a View Like Android Fragment in React Native.
App.js
import * as React from 'react';
import { Text, View, StyleSheet, TouchableOpacity } from 'react-native';
import Screen1 from './pages/Screen1';
import Screen2 from './pages/Screen2';
import Screen3 from './pages/Screen3';

export default class App extends React.Component {
  constructor(props) {
    super(props);
    this.state = { val: 1 };
  }
  renderElement() {
    //You can add N number of Views here in if-else condition
    if (this.state.val === 1) {
      //Return the Screen1 as a child to set in Parent View
      return <Screen1 />;
    } else if (this.state.val === 2) {
      //Return the Screen2 as a child to set in Parent View
      return <Screen2 />;
    } else {
      //Return the Screen3 as a child to set in Parent View
      return <Screen3 />;
    }
  }
  render() {
    return (
      <View style={styles.container}>
        <View style={{ flexDirection: 'row' }}>
          {/*To set the FirstScreen*/}
          <TouchableOpacity
            style={styles.button}
            onPress={() => this.setState({ val: 1 })}>
            <Text style={{ color: '#ffffff' }}>1st View</Text>
          </TouchableOpacity>
          {/*To set the SecondScreen*/}
          <TouchableOpacity
            style={styles.button}
            onPress={() => this.setState({ val: 2 })}>
            <Text style={{ color: '#ffffff' }}>2nd View</Text>
          </TouchableOpacity>
          {/*To set the ThirdScreen*/}
          <TouchableOpacity
            style={styles.button}
            onPress={() => this.setState({ val: 3 })}>
            <Text style={{ color: '#ffffff' }}>3rd View</Text>
          </TouchableOpacity>
        </View>

        {/*Text From Parent Screen*/}
        <Text style={styles.paragraph}>
          Example of view like fragment in React Native
        </Text>

        {/*View to hold the child screens
        which can be changed on the click of a button*/}
        <View style={{ backgroundColor: '#ffffff' }}>
          {this.renderElement()}
        </View>
      </View>
    );
  }
}

const styles = StyleSheet.create({
  container: {
    flex: 1,
    backgroundColor: '#ecf0f1',
    padding: 8,
    marginTop: 30,
  },
  paragraph: {
    margin: 24,
    fontSize: 18,
    fontWeight: 'bold',
    textAlign: 'center',
  },
  button: {
    flex: 1,
    alignItems: 'center',
    backgroundColor: '#808080',
    padding: 10,
    margin: 2,
  },
});
Screen1.js
import * as React from 'react';
import { Text, View, StyleSheet, Image } from 'react-native';
export default class Screen1 extends React.Component {
constructor(props) {
super(props);
this.state = { valx: 0 };
// you can define N number of key value paires like JSON.
this.t = setInterval(() => {
this.setState({ valx: this.state.valx + 1 });
}, 1000);
// Simple interval fundtion which will run in every second.
// It will increase valx
}
componentWillUnmount () {
clearTimeout(this.t);
}
render() {
return (
<View style={styles.container}>
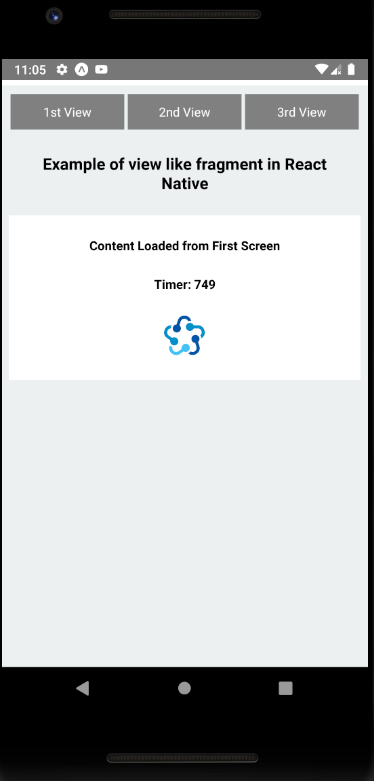
<Text style={styles.paragraph}>Content Loaded from First Screen</Text>
<Text style={styles.paragraph}>{'Timer: ' + this.state.valx}</Text>
<Image
style={styles.logo}
source={{ uri:'ccc',
}}
/>
</View>
);
}
}
const styles = StyleSheet.create({
container: {
alignItems: 'center',
justifyContent: 'center',
padding: 24,
},
paragraph: {
margin: 24,
marginTop: 0,
fontSize: 14,
fontWeight: 'bold',
textAlign: 'center',
},
logo: {
height: 50,
width: 50,
},
});Screen2.js
import * as React from 'react';
import { Text, View, StyleSheet, Image } from 'react-native';
export default class Screen2 extends React.Component {
constructor(props) {
super(props);
this.state = { valx: 0 };
// you can define N number of key value paires like JSON.
this.t = setInterval(() => {
this.setState({ valx: this.state.valx + 1 });
}, 1000);
// Simple interval fundtion which will run in every second.
// It will increase valx
}
componentWillUnmount () {
clearTimeout(this.t);
}
render() {
return (
<View style={styles.container}>
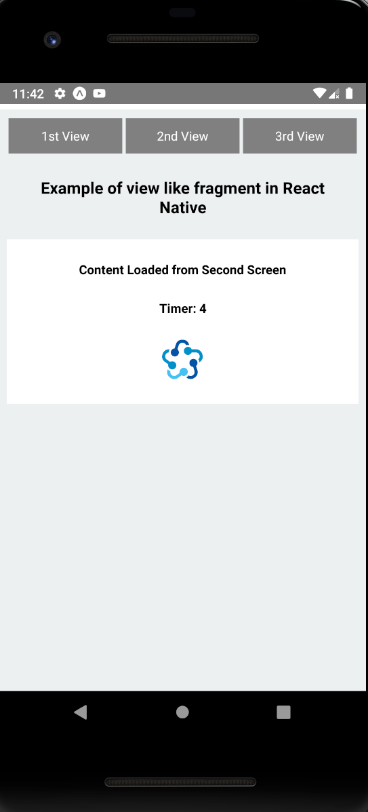
<Text style={styles.paragraph}>Content Loaded from Screen2</Text>
<Text style={styles.paragraph}>{'Timer: ' + this.state.valx}</Text>
<Image
style={styles.logo}
source={{
uri:'ccc',
}}
/>
</View>
);
}
}
const styles = StyleSheet.create({
container: {
alignItems: 'center',
justifyContent: 'center',
padding: 24,
},
paragraph: {
margin: 24,
marginTop: 0,
fontSize: 14,
fontWeight: 'bold',
textAlign: 'center',
},
logo: {
height: 50,
width: 50,
},
});Screen3.js
import * as React from 'react';
import { Text, View, StyleSheet, Image } from 'react-native';
export default class Screen3 extends React.Component {
constructor(props) {
super(props);
this.state = { valx: 0 };
// you can define N number of key value paires like JSON.
this.t = setInterval(() => {
this.setState({ valx: this.state.valx + 1 });
}, 1000);
// Simple interval fundtion which will run in every second.
// It will increase valx
}
componentWillUnmount () {
clearTimeout(this.t);
}
render() {
return (
<View style={styles.container}>
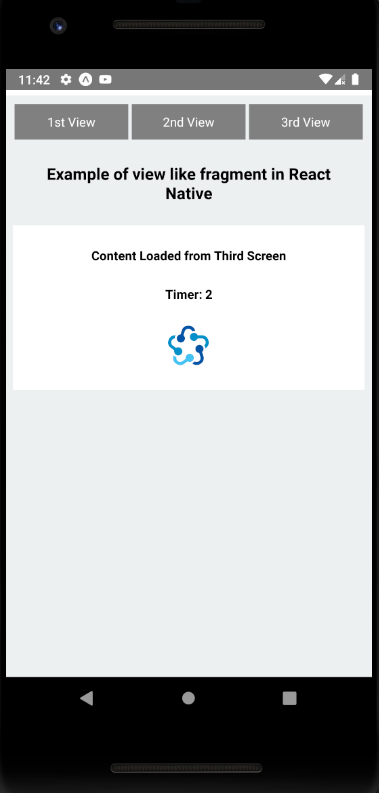
<Text style={styles.paragraph}>Content Loaded from Screen3</Text>
<Text style={styles.paragraph}>{'Timer: ' + this.state.valx}</Text>
<Image
style={styles.logo}
source={{
uri:'ccc',
}}
/>
</View>
);
}
}
const styles = StyleSheet.create({
container: {
alignItems: 'center',
justifyContent: 'center',
padding: 24,
},
paragraph: {
margin: 24,
marginTop: 0,
fontSize: 14,
fontWeight: 'bold',
textAlign: 'center',
},
logo: {
height: 50,
width: 50,
},
});