Hello everyone, In this article, I will talk about how we can install free SSL certificate in GoDaddy.
I know there are many blogs where you can see them, they guide you for an SSL certificate for 3 months.
In this blog, I will guide you on how we can get a SSL certificate for 3 months.
To get a SSL certificate we will follow the below steps
- Create the SSL
- Verify our domain ownership
- Install SSL in Godaddy Domain
- Redirect to HTTPS
Step – 1Create the SSL Certificate
TO create a Free SSL Certificate you have to visit https://app.zerossl.com/login and create your account.
When you logged in to your dashboard you have to click on New certificate.

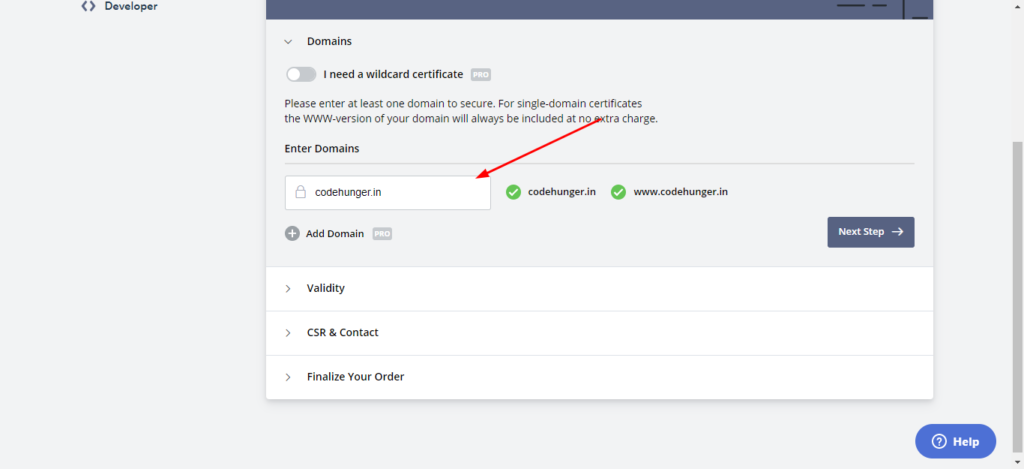
Now under the enter domain field, add your domain name then click on the next step.

Click on 90 day certificate then click on next then you can show option for csr & contact click on next button.

When you reach at finalize your order choose 90 days, free ssl and then click on next.Then you have screen like the below image
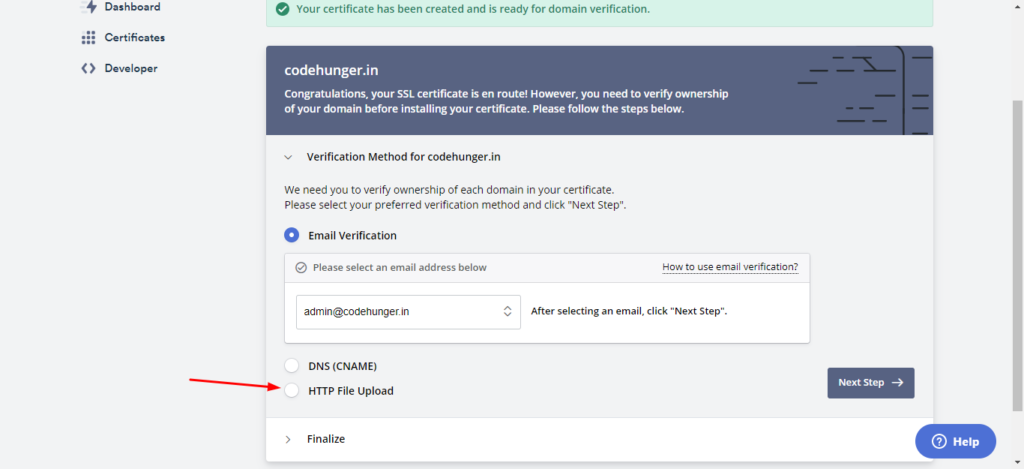
Here you have to click on HTTP file upload,as I have marked with arrow key on the above image.
When clicking on HTTP file upload you have something like the below image, click on download auth file.

Step – 2 Verify Domain Ownership
Now go to godaddy login to your accout, after that you have to open your file manager, for example my file is present under public_html/codehunger.in this is my root path for the domain codehunger.in
Here you have to create a folder in this manner /.well-known/pki-validation/ and then put your download file under pki-validation.
after that click on next, then you have the screen something like below click on the verify domain

Once you verified the domain you have an image something like below one

In this page click on download certificate.zip
Step -3 Install SSL on GoDaddy
Go to your GoDaddy Cpanel and search for SSL, search will show something like this SSL/TLS click on that, then your screen has something like the below image.

Click on manage ssl sites, and then scroll down slowly, you can see the select a domain option click on that and choose your domain

Now we three blank fields below, we have to fill all those field in order to generate SSL for our domain.
Unzip your domain-name.zip file which we have downloaded earlier, when you unzip that file you have these three files, as like the below image.

So we have three files for that three fields so ca_bundle.crt file is for the field Certificate Authority Bundle.certificate.crt file is for Certificate: (CRT) field and private.key file is for Private (Key) field.You can see in the below image I have field all the blank fields.

after that just click on install certificate.
Step – 4 Redirect to HTTPS
To redirect to HTTPS you have to make changes in your .htaccess if you are doing this for your WordPress then you can do this thing simply by using this plugin- click here.
If you are not using WordPress then you can add the below code in your .htaccess file.
RewriteEngine On RewriteCond %{SERVER_PORT} 80
RewriteRule ^(.*)$ https://www.yourdomain.com/$1 [R,L]
I hope you like this article please give me 5 stars, so that I can keep posting articles like this.