How to implement Redux-Saga in React Native Application For An Asynchronous Flow
What Is Redux Saga?
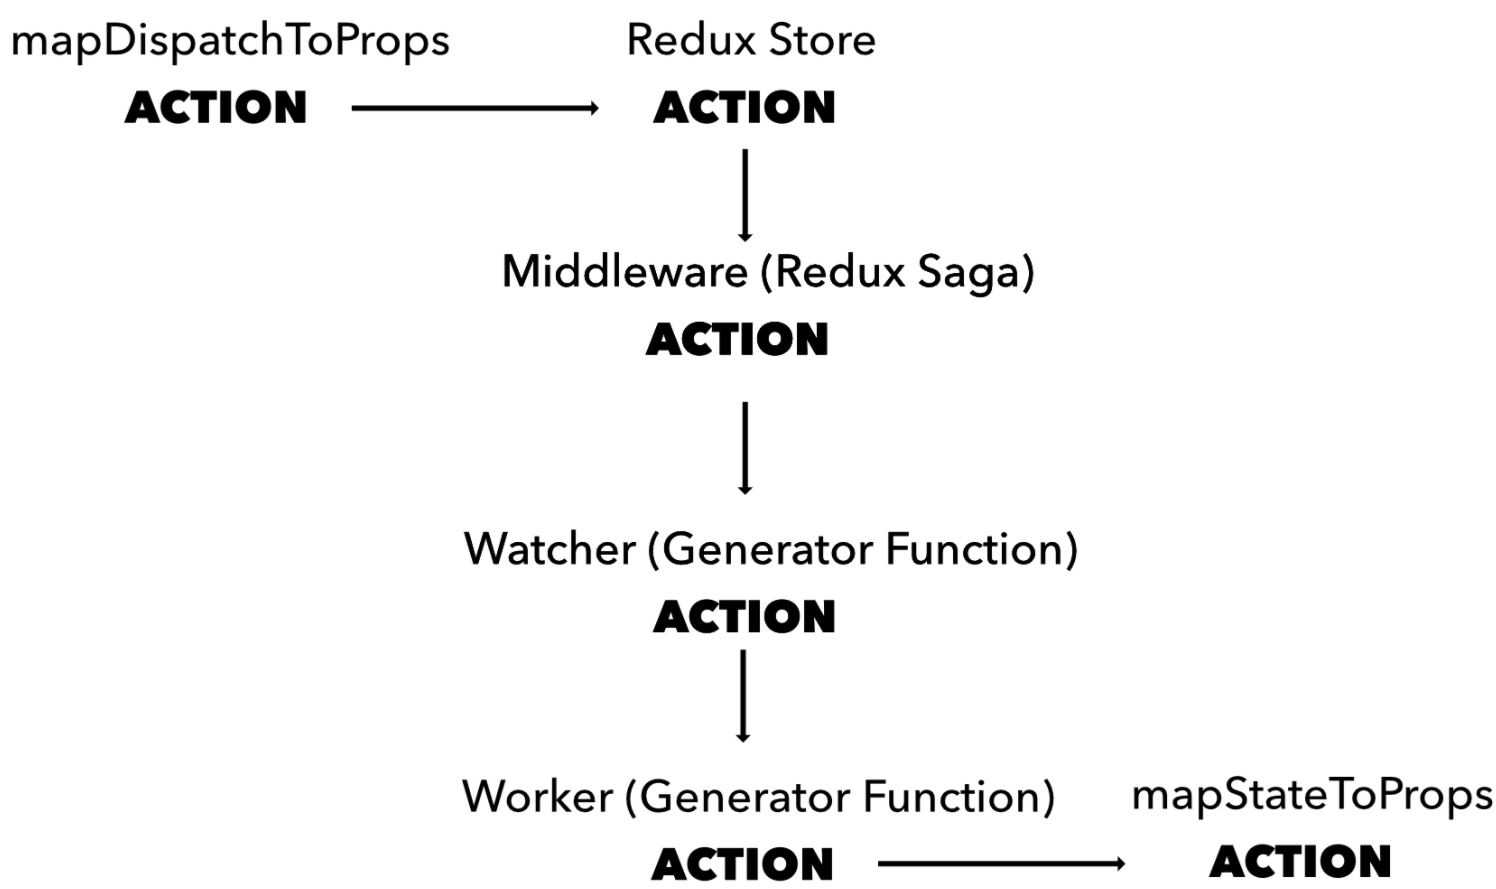
Redux Saga is a library that’s used as a middleware for Redux. A Redux middleware is code that intercepts actions coming into the store via the dispatch() method and can take perform tasks based on the action received. Sagas watch all actions (observer/watcher) that are dispatched from the store. Before the action is passed on to the props, the other function (worker) will process what to do with the action in asynchronous flow.
Redux Saga uses an ES6 feature called Generators, which allows you to write asynchronous code. It’s important to know how the flow of Redux Saga works, specifically what happens with the Sagas (Generator Functions). Generator Functions allow queueing operations using yield, making it asynchronous.
When to use Redux Saga
In an application using Redux, when you fire an action something changes in the state of the app.
As this happens, you might need to do something that derives from this state change.
For example you might want to:
- make a HTTP call to a server
- fetch some data from a GraphQL server
- save something to the cache or browser local storage
Those are all things that don’t really relate to the app state, or are async, and you need to move them into a place different than your actions or reducers (while you technically could, it’s not a good way to have a clean codebase).
Enter Redux-Saga, a Redux middleware helping you with side effects. We can also use Redux Thunk but contrary to redux-thunk, you don’t end up in callback hell, you can test your asynchronous flows easily and your actions stay pure.

Why should I use Redux saga?
Redux–saga is a redux middleware library, that is designed to make handling side effects in your redux app nice and simple. It achieves this by leveraging an ES6 feature called Generators, allowing us to write asynchronous code that looks synchronous, and is very easy to test.
At this point, we can allocate three key benefits of sagas:
- Simplicity in organiziting difficult side effects sequences
- Declarative style
- Simplicity of testing
Basic Concept of Redux
Action:
An action is a plain JavaScript object that has a type field. You can think of an action as an event that describes something that happened in the application.
The type field should be a string that gives this action a descriptive name, like "todos/todoAdded". We usually write that type string like "domain/eventName", where the first part is the feature or category that this action belongs to, and the second part is the specific thing that happened.
An action object can have other fields with additional information about what happened. By convention, we put that information in a field called payload.
A typical action object might look like this:
const addTodoAction = { type: 'todos/todoAdded', payload: 'Buy milk'}Reducer:
A reducer is a function that receives the current state and an action object, decides how to update the state if necessary, and returns the new state: (state, action) => newState. You can think of a reducer as an event listener which handles events based on the received action (event) type.
“Reducer” functions get their name because they’re similar to the kind of callback function you pass to the Array.reduce() method.
Reducers must always follow some specific rules:
- They should only calculate the new state value based on the
stateandactionarguments - They are not allowed to modify the existing
state. Instead, they must make immutable updates, by copying the existingstateand making changes to the copied values. - They must not do any asynchronous logic, calculate random values, or cause other “side effects”
We’ll talk more about the rules of reducers later, including why they’re important and how to follow them correctly.
The logic inside reducer functions typically follows the same series of steps:
- Check to see if the reducer cares about this action
- If so, make a copy of the state, update the copy with new values, and return it
- Otherwise, return the existing state unchanged
Here’s a small example of a reducer, showing the steps that each reducer should follow:
const initialState = { value: 0 }
function counterReducer(state = initialState, action) {
// Check to see if the reducer cares about this action
if (action.type === 'counter/incremented')
{
 // If so, make a copy of `state`
 return { ...state,
// and update the copy with the new value value: state.value + 1 } }
// otherwise return the existing state unchanged return state
}
Reducers can use any kind of logic inside to decide what the new state should be: if/else, switch, loops, and so on.
Store:
The center of every Redux application is the store. A “store” is a container that holds your application’s global state.
A store is a JavaScript object with a few special functions and abilities that make it different than a plain global object:
- You must never directly modify or change the state that is kept inside the Redux store
- Instead, the only way to cause an update to the state is to create a plain action object that describes “something that happened in the application”, and then dispatch the action to the store to tell it what happened.
- When an action is dispatched, the store runs the root reducer function, and lets it calculate the new state based on the old state and the action
- Finally, the store notifies subscribers that the state has been updated so the UI can be updated with the new data.
Flow of Redux:
Redux apps normally have a JS object as the root piece of the state, with other values inside that object.
Then, we define a reducer function. The reducer receives two arguments, the current state and an action object describing what happened. When the Redux app starts up, we don’t have any state yet, so we provide the initialState as the default value for this reducer:
// Create a "reducer" function that determines what the new state
 // should be when something happens in the app
 function counterReducer(state = initialState, action) {
   // Reducers usually look at the type of action that happened
   // to decide how to update the state
   switch (action.type) {
     case 'counter/incremented':
       return { …state, value: state.value + 1 }
     case 'counter/decremented':
       return { …state, value: state.value - 1 }
     default:
       // If the reducer doesn't care about this action type,
       // return the existing state unchanged
       return state
   }
 }
Action objects always have a type field, which is a string you provide that acts as a unique name for the action. The type should be a readable name so that anyone who looks at this code understands what it means. In this case, we use the word ‘counter’ as the first half of our action type, and the second half is a description of “what happened”. In this case, our ‘counter’ was ‘incremented’, so we write the action type as 'counter/incremented'.
Based on the type of the action, we either need to return a brand-new object to be the new state result, or return the existing state object if nothing should change. Note that we update the state immutably by copying the existing state and updating the copy, instead of modifying the original object directly.
Let’s Start Coding
Step 1: Install Necessary Packages.
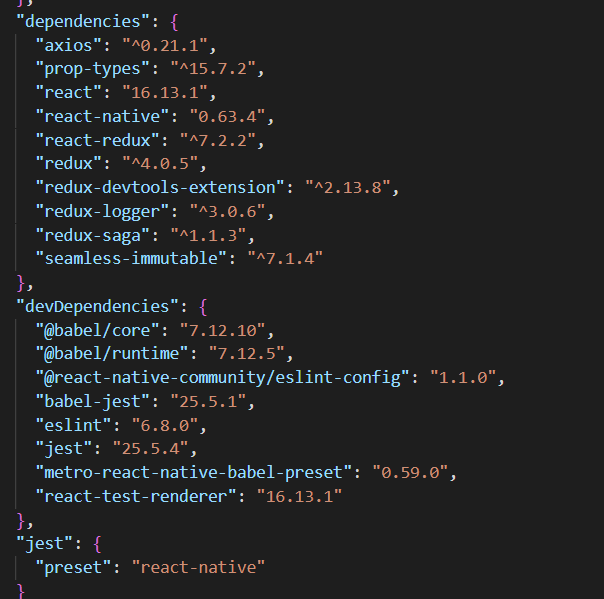
npm install react-redux redux redux-devtools-extension redux-logger redux-saga seamless-immutable prop-types –save
These are the list of packages which we are going to use in our application.
After installing all the packages your package.json looks like this image.
Step 2: Create the Folder Structure and add the neccasary files into them.
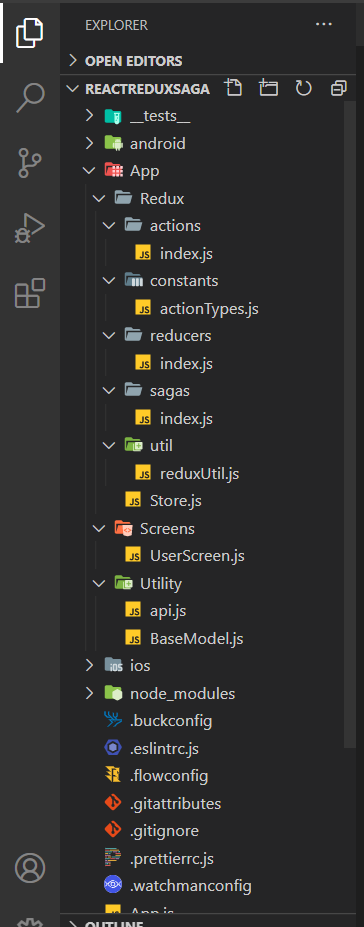
After creating the folder structure and adding all the files we started writing the codes for calling the API using the Redux-Saga.
First we add the actionTypes in our constant folder to call the methods using the constant name just like below code.
actionTypes.js:
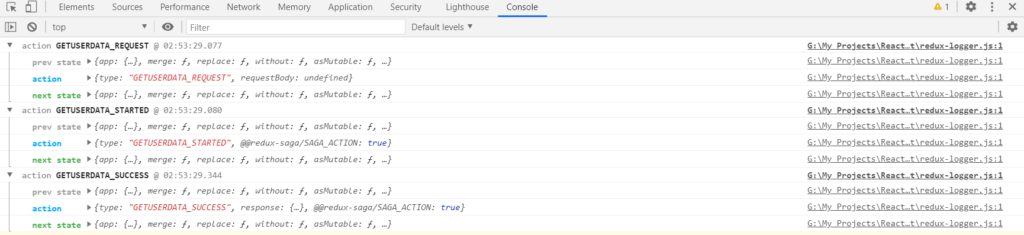
export const GETUSERDATA_STARTED = 'GETUSERDATA_STARTED';
export const GETUSERDATA_REQUEST = 'GETUSERDATA_REQUEST';
export const GETUSERDATA_SUCCESS = 'GETUSERDATA_SUCCESS';
export const GETUSERDATA_FAILURE = 'GETUSERDATA_FAILURE';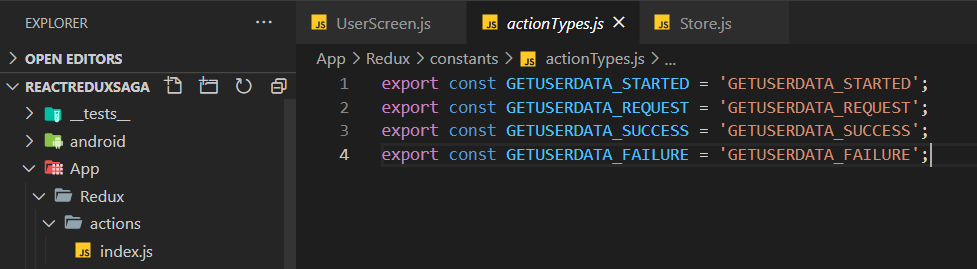
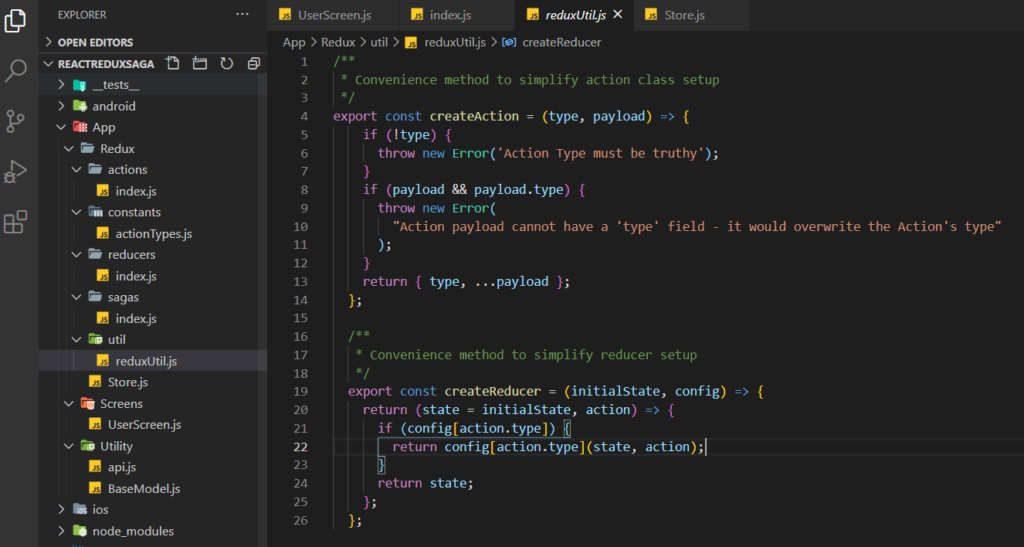
reduxUtil.js:
In this file we write our createAction() and createReducer() methods for setting up the actions and reducer which are the main part of redux.
/**
 * Convenience method to simplify action class setup
 */
export const createAction = (type, payload) => {
    if (!type) {
      throw new Error('Action Type must be truthy');
    }
    if (payload && payload.type) {
      throw new Error(
        "Action payload cannot have a 'type' field - it would overwrite the Action's type"
      );
    }
    return { type, ...payload };
  };

  /**
   * Convenience method to simplify reducer setup
   */
  export const createReducer = (initialState, config) => {
    return (state = initialState, action) => {
      if (config[action.type]) {
        return config[action.type](state, action);
      }
      return state;
    };
  };
action.js:
import {
    GETUSERDATA_STARTED,
    GETUSERDATA_REQUEST,
    GETUSERDATA_SUCCESS,
    GETUSERDATA_FAILURE
} from "../constants/actionTypes";
import { createAction } from '../util/reduxUtil';

// getUserdData action method
export const getUserdDataRequest = (requestBody) =>
    createAction(GETUSERDATA_REQUEST, { requestBody });
export const getUserdDataStarted = () =>
    createAction(GETUSERDATA_STARTED);
export const getUserdDataSuccess = (response) =>
    createAction(GETUSERDATA_SUCCESS, { response });
export const getUserdDataFailure = () =>
    createAction(GETUSERDATA_FAILURE);
In this file we write our code for action method through which we call our API and you also see that I use a createAction() method which is called from reduxUtil. After that we write the reducer code where we set our state according to the response of the API.
Here we use different packages for setting the immutable states and uses these state through out our application.
reducer.js:
import {
    GETUSERDATA_STARTED,
    GETUSERDATA_SUCCESS,
    GETUSERDATA_FAILURE
} from "../constants/actionTypes";
import Immutable from 'seamless-immutable';

import { createReducer } from '../util/reduxUtil';


export const initialState = Immutable.from({
    app: {
        loading: false,
        getUserData: null,
    },
});

export const onGetUserDataStarted = state =>
    state.merge({
        app: state.app.merge({
            getUserData: initialState.app.loginData,
            loading: true,
        })
    });
export const onGetUserDataSuccess = (state, response) => {
    return state.setIn(['app'], {
        getUserData: response.response,
        loading: false,
    });
}
export const onGetUserDataFailure = (state) =>
    state.merge({
        app: {
            getUserData: initialState.app.loginData,
            loading: false,
        }
    });


const appReducer = createReducer(initialState, {
    [GETUSERDATA_STARTED]: onGetUserDataStarted,
    [GETUSERDATA_SUCCESS]: onGetUserDataSuccess,
    [GETUSERDATA_FAILURE]: onGetUserDataFailure
});

export default appReducer;sagas.js:
In this file we write our code for implementing the Saga functionality for calling our api and dispatching methods to manage the states by callings our actions and reducers respectively. We use redux-saga effects put(), takelatest() and all() methods.
If we want to only get the response of the latest request fired (e.g. to always display the latest version of data) we can use the takeLatest helper.
Dispatches an action to the Redux store. Instead of passing in the Redux store or the dispatch action to the saga, you can just use put().
If you want to call two different call methods then you have to use all().
The watcher will watch for dispatched actions and fork a worker on every action.
import { put, takeLatest, all, delay } from 'redux-saga/effects';
import {
    GETUSERDATA_REQUEST
} from "../constants/actionTypes";
import {
    getUserdDataStarted,
    getUserdDataSuccess,
    getUserdDataFailure,
} from '../actions';
import BaseModel from "../../Utility/BaseModel";


// Saga method for Get User Data request
export function* onGetUserDataRequest(action) {
    try {
        yield put(getUserdDataStarted());
        const responseObj = yield BaseModel.getUserdData(action.requestBody);
        if (isValidResponse(responseObj, false)) {
            yield put(getUserdDataSuccess(responseObj))
        } else {
            yield put(getUserdDataFailure())
        }
    } catch (error) {
        console.error(error);
        yield put(getUserdDataFailure());
    }
}


function isValidResponse(responseObj, showAlert, goBack = false) {
    if (responseObj && responseObj.data) {
        if (!responseObj.data.error) {
            if (showAlert) {
                setTimeout(() => {
                    if (goBack) {
                        alert(responseObj.data.message)
                    } else {
                        alert(responseObj.data.message)
                    }
                }, 100)
            }
            return true
        } else {
            setTimeout(() => {
                alert(responseObj.data.message)
            }, 100)
            return false
        }
    } else {
        setTimeout(() => {
           // showMessage(true, strings.responseError)
        }, 100)
        return false
    }
}

export function* actionWatcher() {
    yield takeLatest(GETUSERDATA_REQUEST, onGetUserDataRequest)
}
export default function* rootSaga() {
    yield all([
        actionWatcher(),
    ]);
}BaseModel.js:
Here we write our static methods to call the API with their method types and urls and the responseBody.
import { callApi } from '../Utility/api'

export default class BaseModel {
    static getUserdData(requestBody) {
        return callApi('GET', 'https://jsonplaceholder.typicode.com/todos/1', requestBody)
    }
}api.js:
Here we call our api using fetch() provided by react.
export async function callApi(methodType, apiUrl, requestBody) {
    let apiResponse
    const reqOpts = {
        method: methodType,
        headers: {
            'Content-Type': 'application/json',
        },
    }
    try {
       // const token = await AsyncStorage.getToken(AsyncStorage.KEY_TOKEN)
       //  if (token) {
       //      reqOpts.headers.Authorization = `Bearer ${token}`

       //  }
        if (methodType === 'POST') {
            reqOpts.body = JSON.stringify(requestBody)
        }
        const response = await fetch(apiUrl, reqOpts)
        const data = await response.json()

        apiResponse = {
            data,
            statusCode: response.status,
        }
    } catch (error) {
        console.log('callApi', error)
    }
    return apiResponse
}Store.js:
Here we write our code for implementing saga as middleware.
import createSagaMiddleware from 'redux-saga';
import reducer from './reducers';
import { logger } from 'redux-logger';
import rootSaga from './sagas';
import { createStore, applyMiddleware } from 'redux';


const sagaMiddleware = createSagaMiddleware();
export const store = createStore(
    reducer,
    applyMiddleware(sagaMiddleware, logger),
);

sagaMiddleware.run(rootSaga);App.js:
The <Provider /> makes the Redux store available to any nested components that have been wrapped in the connect() function. Since any React component in a React Redux app can be connected, most applications will render a <Provider> at the top level, with the entire app’s component tree inside of it.
import React, { Component } from 'react';
import UserScreen from './App/Screens/UserScreen';
import { store } from './App/Redux/Store';
import { Provider } from 'react-redux';


class App extends Component {
  render() {
    return (
      <Provider store={store}>
        <UserScreen />
      </Provider>
    )
  }
}


export default App;UserScreen.js:
In this screen we write our code for calling the API using our actions and setting the states using the reducer. Here we use connect function, proptypes, mapStateToProps, mapDispatchToProps.
The connect() function connects a React component to a Redux store. It provides its connected component with the pieces of the data it needs from the store, and the functions it can use to dispatch actions to the store.
PropTypes is a library that helps in minimizing this problem in React by checking the types passed in the props object against a specification we set beforehand and to raise a warning if the types passed don’t match the types expected.
As the first argument passed in to connect , mapStateToProps is used for selecting the part of the data from the store that the connected component needs. It’s frequently referred to as just mapState for short. … It receives the entire store state, and should return an object of data this component needs.
mapDispatchToProps is the second argument that connect expects to receive. In the context of a react-redux application, the mapDispatchToProps argument is responsible for enabling a component to dispatch actions.
componentDidUpdate – This is a lifecycle in React that gets called right after a change in props or state change has occurred.
import React, { Component } from 'react';
import { View, Text, Button } from 'react-native';
import { getUserdDataRequest } from '../Redux/actions'
import PropTypes, { string } from 'prop-types';
import { connect } from 'react-redux';

class UserScreen extends Component {

    state = {
        data: 'Hii',
    }

    static propTypes = {
        getUserdDataRequest: PropTypes.func.isRequired,
        loading: PropTypes.bool.isRequired,
        getUserData: PropTypes.object,
    }
    callAPI = () => {
        this.props.getUserdDataRequest();
    }

    async componentDidUpdate(prevProps) {
        const { getUserData } = this.props;
        if (getUserData && prevProps.getUserData !== getUserData.data) {
            console.log('kk', getUserData);
            this.setState({ data: getUserData.data.title });
        }
    }


    render() {
        return (
            <View style={{ flex: 1, justifyContent: 'center', alignItems: 'center' }}>
                <Text>
                    {this.state.data}
                </Text>
                <Button title='Click Me' onPress={() => this.callAPI()} />
            </View>
        );
    }
}

const mapStateToProps = (state) => ({
    loading: state.app.loading,
    getUserData: state.app.getUserData,
});

const mapDispatchToProps = {
    getUserdDataRequest,
};

export default connect(
    mapStateToProps,
    mapDispatchToProps
)(UserScreen);